Get Started
- Author
Aplus Team
- Date
11.11.2021
- Main questions:
What are RST and Sphinx?
- Topics:
In this section, we will present the following topics:
- Requirements:
You only need basic computing and programming skills, prior knowledge about markup languages might be beneficial.
A basic environment setup, as detailed in Module "Set up environment"
- Estimated working time:
30 min.
What is reStructuredText?
RST is basically another markup language. Markup languages make use of symbols and keywords to structure the content of the documents. Therefore, creating RST documents force you to follow a different workflow from the one you would typically follow when creating documents with traditional WYSIWYG editors, such as Microsoft Word or Google documents.
Let's start by destructuring a small snippet of RST code. The RST syntax is rather intuitive and follows the logic of any other markup languages. If you have no experience using markup languages, it may be more difficult for you to start authoring RST courses. But you do not have to worry, the learning curve of the RST markup language is low, and once you start writing your first document, you will find it easier to produce new content. Besides, you can use this whole module as a boilerplate for the creation of your course content.
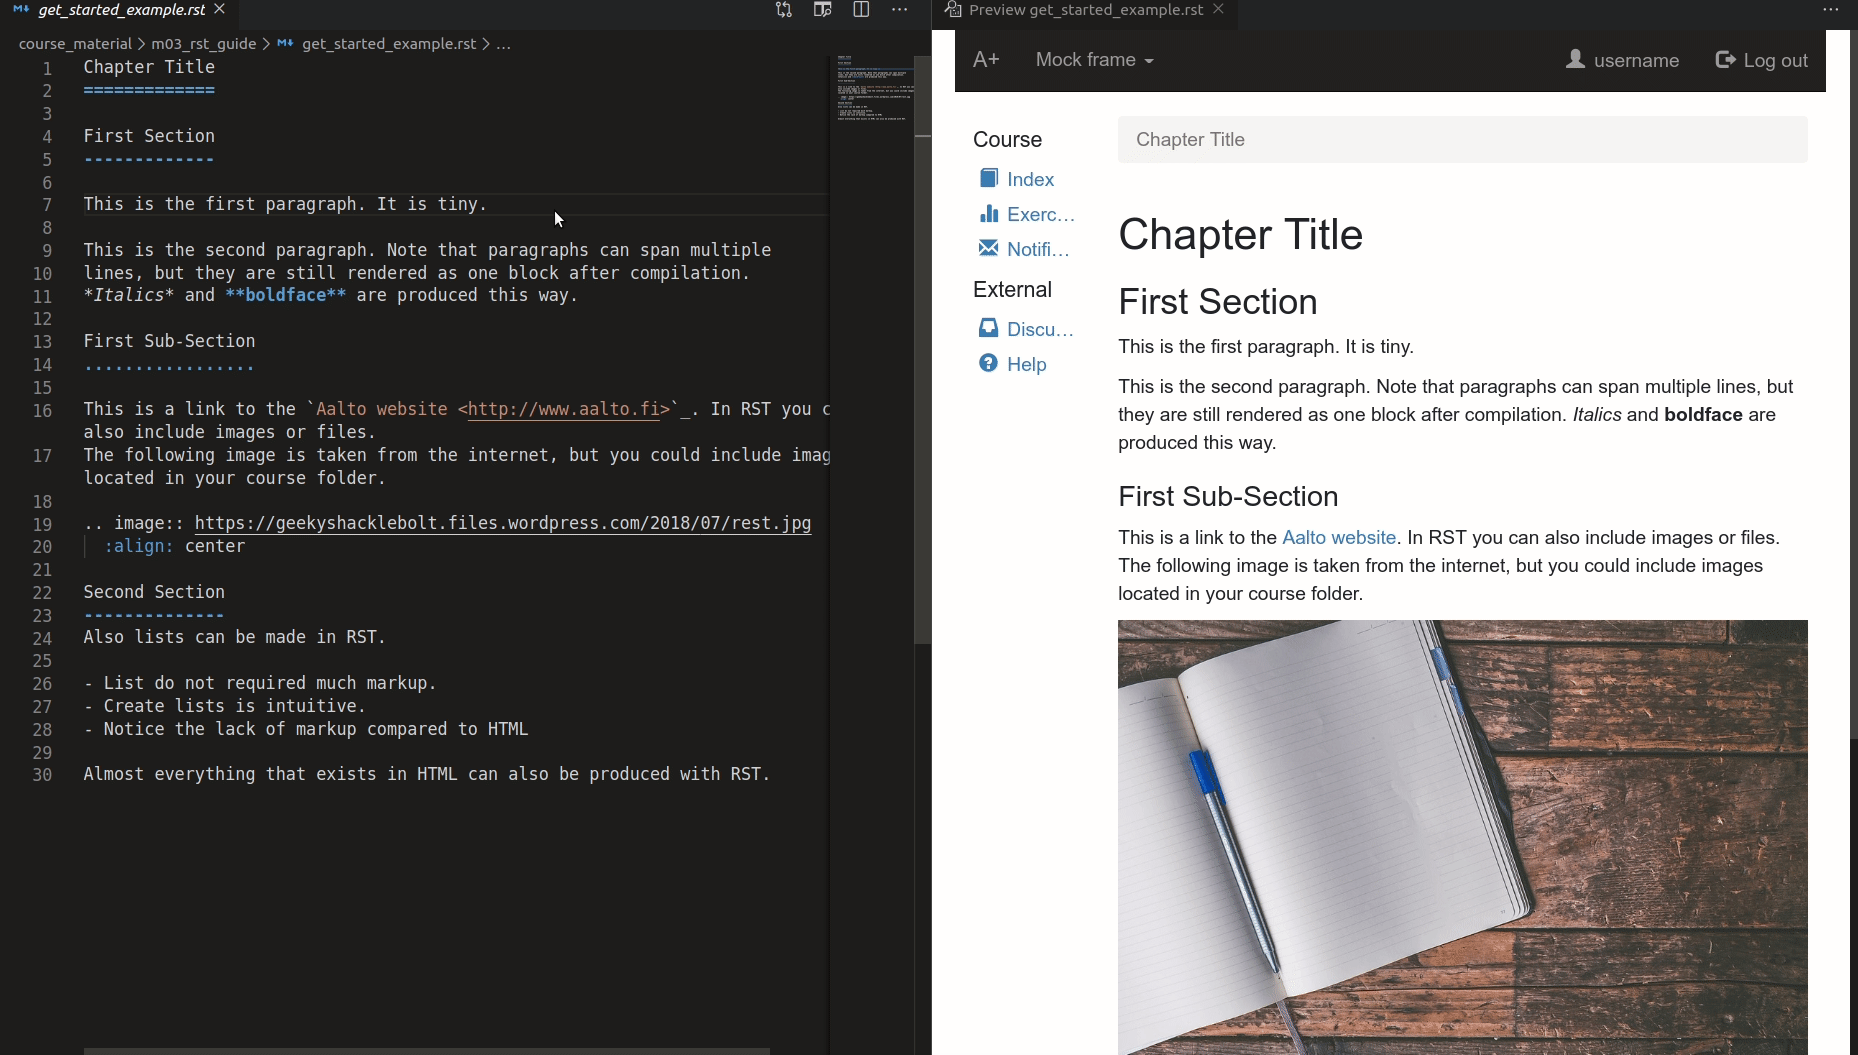
The following snippet of code presents a perfectly valid RST document. The code contains a set of markup symbols and keywords with a syntactical meaning that will help you to structure the content of your documents.
Basic structure of an RST document
Chapter Title
=============

First Section
-------------

This is the first paragraph. It is tiny.

This is the second paragraph. Note that paragraphs can span multiple
lines, but they are still rendered as one block after compilation.
*Italics* and **boldface** are produced this way.

First Sub-Section
.................

This is a link to the `Aalto website <http://www.aalto.fi>`_. In RST you can also include
images or files. The following image is taken from the internet, but you could include images
located in your course folder.

.. image:: https://geekyshacklebolt.files.wordpress.com/2018/07/rest.jpg
  :align: center
  :class: img-responsive

Second Section
--------------
Lists can also be made in RST.

- Lists do not require much markup.
- Create lists is intuitive.
- Notice the lack of markup compared to HTML

Almost everything that exists in HTML can also be produced with RST.
A link to the Aalto.fi website.
An unordered list of elements.
The example below illustrates how a piece of RST code looks like in its HTML representation. In this example, you can see how each RST symbol and keyword has an equivalent representation in HTML.
input: RST
Chapter Title
=============

First Section
-------------

This is the first paragraph. It is tiny.

This is the second paragraph. Note that paragraphs can span multiple
lines, but they are still rendered as one block after compilation.
*Italics* and **boldface** are produced this way.

First Sub-Section
.................

This is a link to the `Aalto website <http://www.aalto.fi>`. In RST you can also include
images or files. The following image is taken from the internet, but you could include images
located in your course folder.

.. image:: https://geekyshacklebolt.files.wordpress.com/2018/07/rest.jpg
  :align: center
  :class: img-responsive

Second Section
--------------
Lists can also be made in RST.
- Lists do not require much markup.
- Create lists is intuitive.
- Notice the lack of markup compared to HTML

Almost everything that exists in HTML can also be produced with RST.
rendered: HTML
Chapter Title
First Section
This is the first paragraph. It is tiny.
This is the second paragraph. Note that paragraphs can span multiple lines, but they are still rendered as one block after compilation. Italics and boldface are produced this way.
First Sub-Section
This is a link to the Aalto website. In RST you can also include images or files. The following image is taken from the internet, but you could include images located in your course folder.

Second Section
Lists can also be made in RST.
- Lists do not require much markup.
- Create lists is intuitive.
- Notice the lack of markup compared to HTML
Almost everything that exists in HTML can also be produced with RST.
Task
Visit rst.ninja.org, then copy and paste the RST code snippet and see how it looks like in a browser.
As you observed in the previous task, it is possible to use an online editor to create and visualise RST files. However, the best thing you can do to create RST documents is to use a standalone text editor on your computer. The Text editors and integrated development environments chapter has some recommendations about the best text editors and IDEs for creating course content. Using the recommended IDEs help develop course content more efficiently and make the experience of creating such courses more enjoyable and less error-prone.
What is Sphinx?
Sphinx is a tool designed to create intelligent and elegant documentation in software projects. However, the A+ team identified this tool's enormous potential and decided to use Sphinx for creating smart, interactive, and robust courses at the university level. The primary function of Sphinx within the A+ environment is to read the RST code and produce HTML and YAML files. The HTML files are used to render the content of the courses in the browser, while the YAML files are used to set up different exercises and external services/tools that are part of the course.
Directives and Roles
Directive
Directives are used to build relatively complex elements within your documents, such as code blocks, quotes, figures, and tables. The directive block consists of four main parts. The directive name, the directive argument, the directive options, and the directive content. The directive name as its name indicates is the name of the RST directive. The directive argument is any text after the double colon. The argument sometimes has some syntactical meaning, but it depends on the directive we are using. The directive options are a predefined set of options that can be used to add some functionality to the directive itself. Note that colons wrap each option, and if the option has arguments, there must be whitespace between the trailing colon and the options argument. Finally, the directive content is any indented text or another directive that complements the directive.
If you want to use directives, you must follow the next syntactical rules. Directives start with two consecutive periods, followed by a whitespace, the name of the directive (directive type), and two consecutive colons. The example below explains this syntax in more detail.
Warning
RST directives are case-insensitive
RST directives require blank lines between the paragraphs and the directives.
This code example shows the basic structure of an RST directive.
.. sidebar:: Sidebar Title
  :subtitle: Optional subtitle
  :class: align-center

  Subsequent indented lines comprise
  the body of the sidebar, and are
  interpreted as body elements.
All directives start with two consecutive periods.
Whitespace between the two initial periods and the directive name.
Directive name.
Double colon.
Whitespace between the double colon and the directive arguments.
Directive arguments.
Indented directive options.
Option argument. (Notice that a whitespace is required between the option and the option's arguments)
Indented directive content.
Role syntax
Roles are also used to represent different elements within your document. However, roles do not have the same complexity as the directive. In order to use a role, it is necessary to follow the following syntax rules. Roles always start with a colon, followed by the role element, a colon, a single backquote, the text and closing backquote. The example below present this syntax in more detail.
Warning
RST roles are case-insensitive
RST text inside the backquotes can no start or finish with whitespaces.
This code example shows the basic structure of the RST role
The download role looks like follows :download:`Any text </course_material/file.csv>`

The mathematical formulas role looks like follows :math:`a^2 + b^2 = c^2`
Colon opening
Role name
Closing colon
Back quote opening
Role content
Closing backquote
As you observed in the example above, the directive block consists of the role name, and role content. The role name is the name used to invoke the role, and the role content may vary among roles, and therefore the documentation should be reviewed.
Hint
It is always possible to create custom roles within your document.
What are the benefits of RST and Sphinx?
Some of the most remarkable benefits of using RST are:
Writing RST code is much simpler than writing HTML.
RST allows producing LaTeX documents, PDF handouts, EPUB content, slides and plain text files.
It is possible to create new RST directives and RST roles.
Resulting HTML pages are automatically interlinked.
Authors can add customised CSS.
Automatic code highlighting for your code examples.
Note
Thus far, the A+ team has developed a set of custom directives that can be easily integrated into the A+ courses. These directives are designed to support teaching and keep students engaged in the course. More information about the A+ directives can be found in the A+ RST tools repository.
If you want to know more about RST and Sphinx, we recommend you to Watch the following video.
How should I read the reStructuredText official documentation?
RST has two types of elements that are widely used to create RST documents. The first element is known as role, while the second one is known as directive. The official RST documentation explains in great detail most of the roles and directives. However, if you do not know how to read the official documentation, it may be rather difficult to take advantage of it. Therefore, in this section, we will explain how to read the official documentation.
Directive
As you can see, the image below shows the documentation of the sidebar directive. You can find the official documentation in the RST directives documentation.
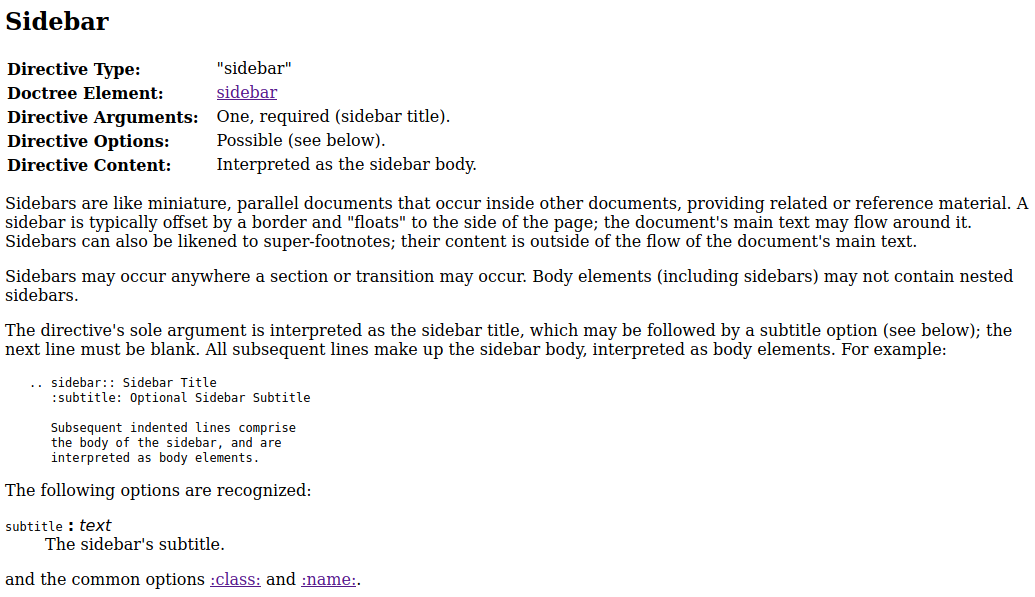
The official documentation explains whether or not the directive arguments and the directive options are required or optional. The documentation also includes a brief description of the directive, and in most cases, it is possible to find a small example. If you want to review the directive's appearance on an HTML page, remember that you can copy and paste the example in rst.ninja.org or use VS Code in conjunction with the Aplus tools official extension.
Hint
If you want to have custom directives in your course, you can create a GitHub issue and suggest your ideas to the A+ Team in the Aplus-RST-Tools GitHub repository. Of course, you can also create the directive and share it with the A+ team.
Role
As you can see, the image below shows the documentation for the math role. You can find the
official documentation in the RST roles documentation.
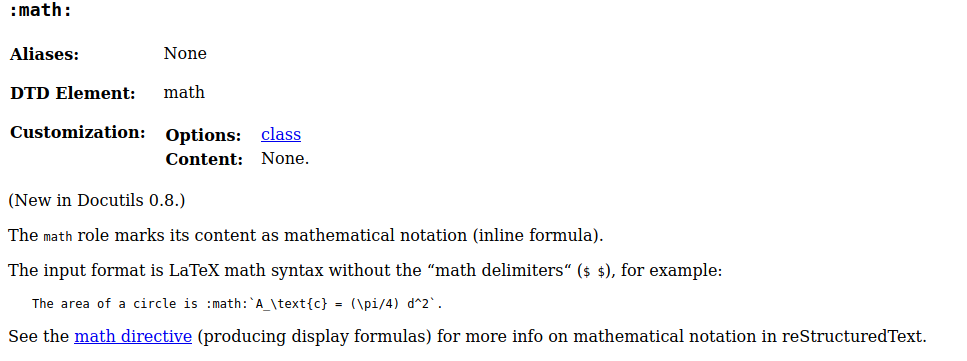
The documentation generally explains the roles and their syntax. It is also possible to find some
examples. The documentation also includes some customisations, but those are not relevant for the A+
users. Notice that, in this case, if you try to run the math example in rst.ninja.org, the
online application does not recognise the role, and therefore, it is not possible to render the above
example in such a website. This is because the online tool does not have access to the Math library
required for rendering the math role.
Tips to start creating your course
Before embarking on creating a course, the first step is to create an outline of the modules, chapters, and sections. Once you have a proper structure is time to start typing some content using RST. Remember that having a well-thought structure will make it easier to keep the content of your course coherent. For example, the structure we created for the RST Guide module consists of four chapters, and each chapter discusses specific topics.
Get started: Introduction to RST and Sphinx
Basic syntax: The most basic RST directives and roles
Advanced syntax: Advanced RST directives and roles, which are used to add complex material to the course.
Additional resources: List of resources that contains valuable information about the module topic.
After we planned the module, we proceeded to design a consistent structure for each chapter. The following is the structure for most of the chapters.
Header: Styled topic
Introduction: Introduction (optional)
Content:
Structural elements
Body elements
Inline elements
Each section inside the Content section is divided as follows:
Definition
Warnings
RST input + syntax
HTML output
Reference to the official documentation
As you can observe, we followed a precise and concise plan that helped us to keep the module organised. Of course, our planning is not the only way of doing things, but we want to emphasise the importance of planning before start writing your course content.
Another aspect to consider while creating the course is how you use Docker. When you are only
writing learning material that contains RST text, links and MathJax notation, you do not need to
stop the containers, then run the ./docker-compile.sh and run ./docker-up.sh again. In these
cases, you can solely run the ./docker-compile.sh command, and your changes will be reflected
on the browser. However, if you add or remove RST files or edit RST exercises such as the Acos,
coding, Rubyric exercises or others, you will need to stop the docker containers, compile the course
and run the docker containers again.
Another trick to view the course is to use the Aplus tools extension in VS Code. This extension might not render all the Aplus directives, but definitively, it will help you to edit the content of your course and quickly visualise how those changes will render in A+. The image below shows an example of how this feature works.
The Aplus tools VS Code extension also contains a set of snippets that may help you to create the course content more efficiently and will help you to avoid syntax errors when writing RST.
The "=, -, and ." symbols underline a sentence that is rendered as a heading in the browser.