Luet oppimateriaalin englanninkielistä versiota. Mainitsit kuitenkin taustakyselyssä osaavasi suomea. Siksi suosittelemme, että käytät suomenkielistä versiota, joka on testatumpi ja hieman laajempi ja muutenkin mukava.
Suomenkielinen materiaali kyllä esittelee englanninkielisetkin termit.
Kieli vaihtuu A+:n sivujen yläreunan painikkeesta. Tai tästä: Vaihda suomeksi.
Chapter 6.3: Collections and Snakes

Introduction
This chapter will introduce you to a set of powerful higher-order methods that you can use instead of loops, or in combination with them. All of these methods have a couple of things in common: they are provided by the collection classes of the Scala API, and they take in functions that specify what to do with the elements of the target collection. The methods respond to needs such as these:
How can I repeat an operation on each element of a collection?
How can I examine a collection’s overall properties (e.g., whether all of its elements are similar to each other in some respect)?
How can I select some of a collection’s elements (e.g., all the elements that match a particular criterion)?
How can I combine elements to produce a result (e.g., the sum of squares of all elements, or a combination of all the pictures in a collection)?
How can I compute a separate result from each of a collection’s element? (E.g., given a vector of person objects, how can I produce a vector of their social security numbers?)
Once you get used to the upcoming methods, you will probably find them very convenient. You’ll find that the methods enable you to write code that is expressive and to-the-point. These methods are especially typical of functional programming (more on which in 11.2), whereas imperative programming has traditionally preferred loops.
Much of this chapter consists of small examples of API methods. In that respect, we pick up where we left off in Chapter 4.1, which introduced a variety of first-order methods on collections.
For simplicity, many of the examples below feature integer vectors. However, the same methods work for other collection types, too, and for non-integer elements.
Many of the examples use function literals (Chapter 6.2) — both in the full form and abbreviated with underscores — so before you continue, please ensure that you understand those notations.
Repeating an Operation with foreach
In a sense, the most generic of all the higher-order methods on Scala collections is
foreach. As a first example, let’s use this method to print out the squares of each
number in a collection.
val numbers = Vector(10, 5, 4, 5, -20)numbers: Vector[Int] = Vector(10, 5, 4, 5, -20)
numbers.foreach( n => println(n * n) )100
25
16
25
400
As its name suggests, foreach performs the given operation
on each element of the collection. In this case, it computes
the square of each element and prints it out.
Even though the method name contains two English words, it is
(against convention and somewhat confusingly) spelled with a
lower-case E.
You probably noticed already that foreach does pretty much the same thing as
repeatForEachElement, the higher-order function you wrote in Chapter 6.1. The main
difference is that foreach is a library method available on all collections, and
you can use it in any Scala program.
foreach expects to be given a function that returns Unit. Any function that you pass
to foreach should therefore bring about an effect of some sort, such as printing (as
above) or modifying an object’s state.
Loops vs. methods on collections
As was already mentioned, the methods in this chapter can be used for similar purposes
as loops. This is especially obvious in our first method, foreach. After all, you
can also write:
for n <- numbers do
  println(n * n)
And indeed these two do the same thing:
for element <- elements do
  Do something with the element.
elements.foreach( element => Do something with the element. )
As a matter of fact, a for loop such as the above is just a different way of writing
a foreach call. The Scala compiler automatically translates it into a method call.
As another example, here is one of the methods from Chapter 5.5’s AuctionHouse class:
def nextDay() =
  for current <- this.items do
    current.advanceOneDay()
We could have just as well written:
def nextDay() =
  this.items.foreach( item => item.advanceOneDay() )
Which one is nicer to read depends on context and on the programmer’s personal taste.
In O1, we’ll use foreach often, but we’ll continue to use the for loop as well. Feel
free to use whichever you prefer, but an educated Scala programmer needs to be familiar
with both.
A+ presents the exercise submission form here.
Assignment: Reimplementing Election (Part 1 of 3)
In Chapter 5.6, you wrote a number of methods for class District in module Election.
(If you didn’t, do that now or see the example solution.) At that time,
you (probably) used loops to implement the methods.
Rewrite one of the methods, printCandidates. Replace the loop with a foreach method
call.
We’ll get back to the other District methods later.
A+ presents the exercise submission form here.
Interlude: Levels of Abstraction
Restrictions on Anonymous Parameters (Part 1 of 2)
In Chapter 6.2, you saw that function literals in Scala have two forms: the full form
features the arrow =>, and the abbreviated form features the underscore _ In the
latter, it is not only the function that is anonymous, but its parameters, too.
(first, second) => first + second + 10
_ + _ + 10
The shorter form works in many cases, but not everywhere. Before we take a look at some more methods on collections, let’s examine a couple of examples that illustrate a limitation of the shorter literals.
Here is a function that uses its parameter to compute a result. The key thing to note here is that the function body features the same parameter more than once.
def compute(number: Double) = number * number + 10
We can express the same computation as an anonymous function:
number => number * number + 10
However, this abbreviated literal fails to do the same thing:
_ * _ + 10
Since each underscore corresponds to a separate anonymous parameter, the above literal does the same as these functions:
(number1, number2) => number1 * number2 + 10
def compute(number1: Double, number2: Double) = number1 * number2 + 10
That is, the literal defines an entirely different function with two parameters.
You may use each anonymous parameter just once within the function literal: each underscore refers to a separate parameter, in order. If you need to refer multiple times to one of a function literal’s parameters, use a full literal with named parameters.
Here is another example of the same restriction:
numbers.foreach( n => println(n * n) )
The parameter variable n appears multiple times in the
function body, so the parameter needs a name.
Examining a Collection
Let’s look at some more collection methods.
Checking properties with exists and forall
The exists method determines whether any of the elements in the collection
meets a particular criterion:
val numbers = Vector(10, 5, 4, 5, -20)numbers: Vector[Int] = Vector(10, 5, 4, 5, -20)
numbers.exists( _ < 0 )res0: Boolean = true
numbers.exists( _ < -100 )res1: Boolean = false
We give exists a function that takes an element and returns
a Boolean indicating whether the element meets a particular
condition. Here, for instance, we pass in a function that
determines whether its parameter is a negative number.
Our example collection contains (at least) one negative element. It doesn’t contain even a single element less than -100.
forall similarly checks whether all the elements of the collection fulfill the given
criterion:
numbers.forall( _ > 0 )res2: Boolean = false
numbers.forall( _ > -100 )res3: Boolean = true
In this example, we first checked whether all the elements are positive; they aren’t. Then we determined that all the elements are greater than -100.
Getting to know count, exists, and forall
A+ presents the exercise submission form here.
A note on operators in function literals
Selecting Elements from a Collection
The find, filter, takeWhile, and dropWhile methods
The find method goes through the collection and returns the first element it finds that
meets the given criterion. For instance, you could look for the first number that’s less
than five:
val numbers = Vector(10, 5, 4, 5, -20)numbers: Vector[Int] = Vector(10, 5, 4, 5, -20)
numbers.find( _ < 5 )res4: Option[Int] = Some(4)
Notice that find returns an Option wrapped around the value that was found. If the
search results in a miss, you get None:
numbers.find( _ == 100 )res5: Option[Int] = None
filter is similar to find except that it returns a collection of all the elements
that match the criterion. Our vector contains four positive numbers:
val numbers = Vector(10, 5, 4, 5, -20)numbers: Vector[Int] = Vector(10, 5, 4, 5, -20)
numbers.filter( _ > 0 )res6: Vector[Int] = Vector(10, 5, 4, 5)
In Chapter 4.1, you saw a take method that returns a partial collection with the
given number of elements from the beginning of the original collection (say,
numbers.take(3)). take’s higher-order cousin is takeWhile:
val numbers = Vector(10, 5, 4, 5, -20)numbers: Vector[Int] = Vector(10, 5, 4, 5, -20)
numbers.takeWhile( _ >= 5 )res7: Vector[Int] = Vector(10, 5)
As shown above, the method takes elements from the beginning of the collection until it runs into an element that doesn’t meet the given criterion.
A+ presents the exercise submission form here.
filter vs. filterNot; takeWhile vs. dropWhile
Assignment: Reimplementing Election (Part 2 of 3)
This was a good activity.My code is so much shorter now.
Reimplement another method in the District class: candidatesFrom. Replace the for
loop in the method body with a method call. One of the methods introduced above will do
the trick.
A+ presents the exercise submission form here.
Restrictions on Anonymous Parameters (Part 2 of 2)
There is another thing about abbreviated function literals that is good to note before we
proceed. It is best illustrated via examples. In the examples below, we’ll use these familiar
functions, twice and doubled:
def twice(operation: Int => Int, target: Int) =
  operation(operation(target))
def doubled(original: Int) = 2 * original
If we want to apply the doubled function to the number 1000 twice, any of these function
calls works:
twice(doubled, 1000) // just the function name, doubled
twice( x => doubled(x) , 1000) // a regular function literal
twice( doubled(_) , 1000) // an abbreviated function literal
In the next example, we do the following twice: first double the number, then add one. Doing this on 1000, should produce 4003, for instance, since ((1000*2+1) * 2 + 1 equals 4003. Either of the following function calls works:
twice( x => doubled(x) + 1 , 1000) // a regular function literal
twice( doubled(_) + 1 , 1000) // an abbreviated function literal
How about the next example? Here we’d like to do the following twice: add one and double the result. Doing this on 1000 should produce 4006, for instance, since ((1000+1)*2 + 1) * 2 equals 4006. This function call works:
twice( x => doubled(x + 1) , 1000) // a regular function literal
One might think that the above can be abbreviated like this:
twice( doubled(_ + 1) , 1000) // doesn’t work!
However, that abbreviated literal does not work. The key thing
to notice here is that the non-abbreviated literal featured a
pair of round brackets, and within those brackets the parameter
x is not alone but as part of the expression x + 1.
In code like this, the underscore “expands within the inner brackets
only”, so to speak. This means that the function literal does not extend
over the entire expression but only the part within the brackets.
That is, the literal doubled(_ + 1) stands for doubled(x => x + 1),
which isn’t a valid expression, since the doubled function wants
an Int, not a function, as a parameter.
So, that abbreviated literal does not mean what we’d need it to mean here. Fortunately, the result is an instant compile-time error rather than a bug at runtime.
When you have a function literal that needs to use its parameter as part of a computation, within brackets, don’t abbreviate the literal with an underscore; use the longer form instead and give the parameter a name. This rule might seem confusing, but don’t worry. You may always use the longer literal notation if you prefer.
Mapping a Collection of Elements: map and flatMap
Now let’s have a look at two more higher-order methods that collections have.
It is remarkably often useful to “map” a collection of elements to another.
The higher-order method map returns a new collection whose elements have been generated
by applying map’s parameter function to each of original collection’s elements. In the
example below, we use map to compute each element’s absolute value and obtain a new
vector that contains each of the results in order:
val numbers = Vector(10, 5, 4, 5, -20)numbers: Vector[Int] = Vector(10, 5, 4, 5, -20)
numbers.map( _.abs )res8: Vector[Int] = Vector(10, 5, 4, 5, 20)
The following expression determines, for each element, whether or not it is at least five. The output vector contains the resulting Booleans in order:
numbers.map( _ >= 5 )res9: Vector[Boolean] = Vector(true, true, false, true, false)
You can use map in combination with a wide variety of parameter functions. Like the
other methods of this chapter, map is also available on collections other than
vectors. For instance, you can call it on the Range object that you get by writing
1 to 10 (Chapter 5.6):
(1 to 10).map( n => n * n )res10: IndexedSeq[Int] = Vector(1, 4, 9, 16, 25, 36, 49, 64, 81, 100)
One more example, this time with Doubles as elements and a named function as a
parameter:
import scala.math.sqrtval data = Vector(100.0, 25.0, 12.3, 2, 1.21)data: Vector[Double] = Vector(100.0, 25.0, 12.3, 2.0, 1.21)
data.map(sqrt)res11: Vector[Double] = Vector(10.0, 5.0, 3.5071355833500366, 1.4142135623730951, 1.1)
mapping each element with the square-root function gives
us a collection with all the square roots.
Getting to know map
A+ presents the exercise submission form here.
The flatMap method
Chapter 6.1 mentioned a method that “flattens” a collection of collections:
val nested = Vector(Vector(3, -10, -4), Vector(5, -10, 1), Vector(-1), Vector(4, 4))nested: Vector[Vector[Int]] = Vector(Vector(3, -10, -4), Vector(5, -10, 1), Vector(-1), Vector(4, 4))
nested.flattenres14: Vector[Int] = Vector(3, -10, -4, 5, -10, 1, -1, 4, 4)
It’s fairly common that we want to first map a collection to produce a nested
collection, then flatten the result. Here’s a toy example:
val numbers = Vector(10, 5, 4, 5, -20)numbers: Vector[Int] = Vector(10, 5, 4, 5, -20)
val experiment = numbers.map( n => Vector(-n.abs, 0, n.abs) )experiment: Vector[Vector[Int]] = Vector(Vector(-10, 0, 10), Vector(-5, 0, 5), Vector(-4, 0, 4), Vector(-5, 0, 5),
Vector(-20, 0, 20))
experiment.flattenres15: Vector[Int] = Vector(-10, 0, 10, -5, 0, 5, -4, 0, 4, -5, 0, 5, -20, 0, 20)
It’s possible to combine map and flatten into a single method call:
numbers.flatMap( n => Vector(-n.abs, 0, n.abs) )res16: Vector[Int] = Vector(-10, 0, 10, -5, 0, 5, -4, 0, 4, -5, 0, 5, -20, 0, 20)
That is, collection.flatMap(myFunc) does the same as collection.map(myFunc).flatten.
You may well be wondering whether combining map with flatten is so useful that
it merits a separate flatMap method. Yes, it really is. You’ll see as your programming
experience grows during the rest of O1 and later.
Example: users and addresses
For a somewhat more interesting example of map and flatMap, consider the following
class.
class User(val id: String, val emailAddresses: Vector[String]):
  override def toString = this.id + " <" + this.emailAddresses.mkString(",") + ">"
Let’s imagine we’re working on an application that stores User objects in a vector. In
the example below, our vector contains just two users, but of course there could be many
more.
val allUsers = Vector(
  User("sophia", Vector("sophia.student@aalto.fi", "sophia.student@iki.fi", "sophia.student@gmail.com")),
  User("megadestroyer", Vector("teemu.teekkari@aalto.fi", "teemuteekkari@gmail.com"))
)allUsers: Vector[User] =
Vector(sophia <sophia.student@aalto.fi,sophia.student@iki.fi,sophia.student@gmail.com>,
megadestroyer <teemu.teekkari@aalto.fi,teemuteekkari@gmail.com>)
How can we now get a list of all the ids of all the users? What about a list of all
the email addresses of all the users?
Sure, we could write a loop, but the just-introduced methods get the job done with minimal effort.
The map method gives us each user’s identifier if we pass in a function that maps a
user object to its id.
allUsers.map( _.id )res17: Vector[String] = Vector(sophia, megadestroyer)
We can also use map to access the email addresses. This gives us a nested collection
(which, depending on our purposes, may or may not be convenient):
allUsers.map( _.emailAddresses )res18: Vector[Vector[String]] = Vector(Vector(sophia.student@aalto.fi, sophia.student@iki.fi, sophia.student@gmail.com),
Vector(teemu.teekkari@aalto.fi, teemuteekkari@gmail.com))
Assuming we want a single “flat” collection of all the emails, we can use flatMap
instead:
allUsers.flatMap( _.emailAddresses )res19: Vector[String] = Vector(sophia.student@aalto.fi, sophia.student@iki.fi, sophia.student@gmail.com,
teemu.teekkari@aalto.fi, teemuteekkari@gmail.com)
The next programming assignment is not only about methods on collections, but it does provide opportunities to use them.
Assignment: Snake
Snake is a classic computer game that originates from the 1970s. The player controls a “snake” or “worm” that turns about on a two-dimensional field, looking to eat and grow. In the 1990s, Snake renewed its popularity as a mobile game, which has in turn attracted nostalgic attention in more recent years. By the time you read this, the game may have already reverted to passé retro kitch.
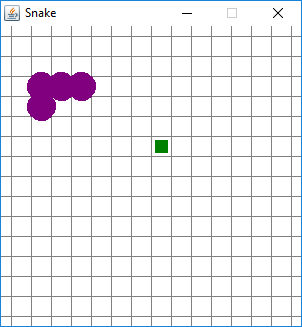
A game of Snake with an overlying grid for illustrative purposes. The green square represents an item of food that the snake can eat next; the food is at location (8,6). The numbering starts at the top left-hand corner, which is (0,0); that space, like the other edge spaces, are only partially visible. The snake in this picture has four segments, which are located at (5,4), (4,4), (3,4), and (3,5).
Snake is also a classic as a programming exercise. Let us join the tradition.
Concepts in Snake
The key components of a game of Snake are the snake itself and the food that the snake seeks to swallow. At any given moment, there is a single item of food available for the snake, located somewhere on the playing field. When the snake eats the food — that is, when the snake’s head is about to hit it — the snake grows and a new item of food appears.
You can think of the playing field as a grid (see image). The food is located in a single space on the grid. The snake consists of segments (“pieces”), each of which takes up a space.
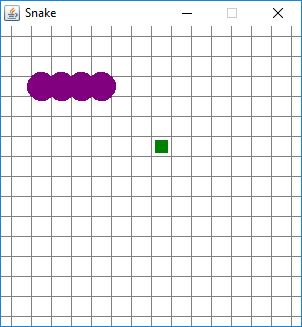
In the first picture above, the snake had traveled upwards and then turned to the right. In this picture, the snake has moved a single additional step from that previous state. The snake’s head has moved a single step to the right and “dragged” the other three segments with it. The location (3,5), which previously contained the last segment, is now empty.
The only thing the player can do is press one of the arrow keys to make the snake turn in that direction. The snake can move only in the four main compass directions.
As time passes, the snake moves step by step: its first segment, or “head”, moves in the latest direction chosen by the player and the other segments follow (see the second image). However, if the head enters the food space, the snake eats the food and grows by a single segment: a new segment appears where the food was and all the other segments remain where they were.
The game is over when the snake’s head hits something other than food.
Classes in Snake
The Snake module contains a partial implementation for the game. The overall design
of the program resembles that of FlappyBug: we have a SnakeGame class that represents
the mutable state of a game and a GUI (in SnakeApp.scala) that displays the state and
receiving commands from the player.
So, an instance of SnakeGame represents a single session of Snake. Calling that
instance’s methods changes its state. The SnakeGame object tracks:
the next item of food: where is it on the grid?
the location of the snake: where on the grid are its segments?
the direction of the (head of the) snake: which of the four compass directions has it been ordered to go?
Our class needs to manipulate locations on the grid as well as directions. For that, we
have tools on hand in package o1:
The classes GridPos and CompassDir
Class GridPos represents coordinates on a grid. Each coordinate is an integer.
This class resembles the
Posyou know but is specifically designed for use with grids and provides some convenient methods to that end.We therefore distinguish between two things: which space something is located at (
GridPos), and which spot within a particular image something should be drawn at (Pos).The
GridPosis part of the program domain’s internal logic (i.e., the rules of Snake). ThePosis a feature of the GUI.This is similar to what we did in the Stars module, where we distinguished between a
StarCoordson a map and aPoswithin an image.
The class CompassDir represents compass directions such as north (up) and
west (left):
It’s well suited for representing the snake’s heading.
It combines well with the methods on
GridPos. For instance, we can ask aGridPosobject which coordinates neighbor it in a particular direction.
Both classes are documented within the O1Library module.
Relationships between classes in and around the Snake module.
A couple of mini-assignments as groundwork
The answers to these questions should help you along as you tackle the main task of implementing the snake game.
A+ presents the exercise submission form here.
A+ presents the exercise submission form here.
The main task
In SnakeGame.scala and SnakeApp.scala, find the locations where something is missing
and implement the missing parts. We suggest that you proceed as follows.
Step 0 of 5: preparations
Run the given program. You should see a playing field with a food item and a single-segment snakeling. (There is no visible grid like in the illustrations above; that’s intentional.) The snake doesn’t move yet.
Study the SnakeGame class. Observe that there are parts missing. Note how the given code
uses the classes GridPos and CompassDir. In the Scaladocs for those other classes, read
at least the introductions at the top; there’s no need to wade through all the methods. (The
Snake module itself has no Scaladocs. All the information you need is in this chapter and
in the Scala code.)
You may want to take a look at SnakeApp.scala, too. As the clock ticks (onTick), the GUI
calls the advance method of the appropriate SnakeGame object. The advance method is
supposed to move the snake, but the given implementation doesn’t do anything yet.
Step 1 of 5: a mobile snake
For now, write a partial implementation for advance: make it move the snake’s head to
the next space. Don’t worry about growing the snake yet.
Notice: The segments variable refers to a single-element vector that contains the location
of the (head of the) snake. This is a var. The advance method should replace its value
with a single-element vector that contains the neighboring location in the direction of the
snake’s current heading.
Example: Suppose the segments variable currently holds a vector whose only element is a
GridPos object that represents the coordinates (2, 4). Further suppose the snake is heading
rightwards. When advance is called, it should replace the value of segments with a new
vector that contains (as its only element) a GridPos object that represents the coordinates
(3, 4).
There is a convenient method in GridPos for determining that neighboring location.
Run the modified program. See the single segment slither.
The game ends when the snake hits an edge. You control the snake with the arrow keys (or WASD). The snake ignores the food.
Step 2 of 5: snake snacks
Develop advance further. The method must now additionally move the food into a new
random location whenever the snake hits it. That relocation of the food happens as part
of the same movement step (i.e., the same call to advance) that puts the snake’s only
segment in the current food space. The advance method should first move the snake,
then the food; the food is moved only if the snake found the food at its current
location.
You can do that by updating the value of the nextFood variable. Use the given method
randomEmptyLocation() to pick a new location. (The method is defined on SnakeGame.
You don’t have to understand its implementation now; it’s enough to call it and use the
GridPos that it returns.)
Try running your program. Food gets eaten, but the snake doesn’t grow.
There’s a GameSpeed constant in SnakeApp.scala. You may adjust it to your liking. You
could slow down the game while testing, for instance.
Step 3 of 5: a growing snake
Next, make the snake grow. Do note, however, that at this step, you’ll only modify the snake’s size in the application’s internal model, not the user interface. This means that the changes you make now won’t — yet — affect what you see onscreen when you launch the game.
Finish up advance. Each time the method is called, the snake either eats (and grows)
or moves, but not both. In other words: 1) when the head is just about to hit the food,
add a segment; 2) otherwise, move the snake but don’t add a segment.
Earlier, we assumed that the segments vector always holds just one single element.
This assumption no longer holds.
In Step 1 above, you wrote a line of code that replaces the value of segments with a
new single-element vector. Remove that line. In its place, write some new code to handle
both of the cases: the head either finds food, or doesn’t.
That is, replace the value of segments with a new vector that contains all the snake’s
locations after the move. There should be either exactly as many segments as before, or
one more.
Instructions and hints:
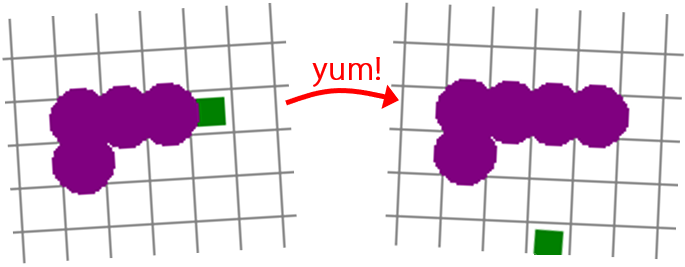
The left-hand image shows a moment just before the snake eats the food that is in front of its head. On the right, the clock has ticked once more and the food’s been eaten: the other segments remain where they were, but a new segment has appeared where the food was. That new segment is now the snake’s head. New food has appeared elsewhere.
Grow the snake from the front. When the snake’s head would end up moving to a food square, don’t move the snake at all. Instead, add a new segment where the food is; it becomes the snake’s new head. (The frontmost segment becomes the second-from-front. All existing segments stay where they are. See the illustration on the right.)
The food must be relocated as part of the same
advancecall that brings the snake’s head to where the food is. (When anadvancecall ends, the food is never where the Snake’s head is.)To form the new vector, you can use the tools from 4.1, which were just revisited in the mini-assignment above.
The segments are identical. You don’t have to move each segment separately. All the middle segments remain within the snake: if you take care of the first and last segments, that’s enough to create the illusion of movement.
You may choose to reveal the additional hint below.
Hint for moving the snake segments
When the snake advances without eating, you need to construct a vector that contains the head’s new location followed by all the snake’s earlier locations except the last. The solution is fundamentally identical with what you did with an
Intvector in the preceding mini-assignment.Also remember that just creating a vector doesn’t store the vector anywhere. You’ll need to do that explicitly.
Try running your program after you complete this step. The snake still doesn’t seem to grow. In fact, it does grow, but you don’t see it, because the GUI draws only the head.
Step 4 of 5: sorting out the graphics
Turn to the GUI in SnakeApp.scala and the makePic method defined there. Observe:
The method places only a single copy of
SegmentPic(reddish picture of a snake segment) against the background.makePicuses an auxiliary functiontoPixelPos, which is defined in the same file. That function takes in aGridPosand determines where in the GUI image that space should be drawn.makePicalso uses aplaceCopiesmethod from classPic. As its first parameter, that method takes a picture. As its second parameter, it takes a vector ofPosobjects. That method works just like the familiarplacemethod, except that it places multiple copies of the same image. Which doesn’t help much yet, since the given code passes in only a single-element vector.
Edit makePic so that it draws all the segments as identical round shapes. Here’s how:
Use
toPixelPosto determine each segment’s position within the image. You don’t need a loop. Use one of the collection methods from this chapter.Call
placeCopies, passing in a vector that contains aPosfor each segment.
The snake grows!
Step 5 of 5: collisions
It is ordained by the tradition of snake gaming that snakes die if they collide with their
own body. Attend to this in class SnakeGame: the isOver method should indicate that
the game is over not only when the snake hits a wall but also if its head shares a location
with any of the other segments. (That is, the game is over when the head is already in
the same location as another segment, not before.)
You may again turn to Chapter 4.1 for tooling.
Additional hint
The snake has a head and a tail. Your method should determine whether the head’s location is among the tail’s locations — that is, whether the tail contains the head. As noted, the tools for doing just that are in Chapter 4.1.
A special case
What should happen when a two-segment snake turns 180 degrees? Does its head segment collide with the single tail segment or not? Or maybe the snake should be prevented from doing that altogether? You choose. The automatic tests for this assignment don’t test that case.
A+ presents the exercise submission form here.
Summary of Key Points
The collection classes of the Scala API define a whole bunch of higher-order methods that operate on the elements of collections.
Methods in common use include
foreach,exists,forall,find,filter,map, andflatMap. You’ll see more later.These methods provide generic solutions to common problems and are often a convenient alternative to loops.
Processing collections in this manner is especially common in so-called functional programming, which Scala encourages.
Links to the glossary: higher-order function; collection; level of abstraction.
Why This Chapter Matters
We’ll make frequent use of the methods introduced above. They will serve you well in upcoming programming assignments.
You’ll need to read a lot of given code that uses these methods.
You may initially struggle to recall each method. Then again, you don’t need to. You can return to this chapter later, or use our Scala Reference.
The important thing for now is to bear in mind the general idea: there is a wide selection of convenient higher-order methods on offer.
Bonus teaser: for–yield expressions
It’s already come up in the ebook that the for–do loops that
we’ve written are just another way of writing a foreach method
call. These two do the same thing:
numbers.foreach( n => println("The square is " + n * n) )
for n <- numbers do
  println("The square is " + n * n) )
Scala’s for construct can be used for a bunch of other things,
too. (But you don’t have to in O1.) For instance, you can write a
map method call as a for expression. These two do the same thing:
val squares = numbers.map( n => n * n )
val squares = for n <- numbers yield n * n
yield is a reserved word that you can
use to make a for expression produce a
result other than Unit.
And below, you’ll find a flatMap call and a for–yield
structure that’s equivalent to it. Both code fragments traverse a
numbers vector twice and produce all possible two-element sums:
val sums = for first <- numbers; second <- numbers yield first + second
val sums = numbers.flatMap( first => numbers.map( second => first + second ) )
You may split a for expression across multiple lines. Here’s
one way to do that:
val sums =
  for
    first  <- numbers
    second <- numbers
  yield first + second
Feedback
Please note that this section must be completed individually. Even if you worked on this chapter with a pair, each of you should submit the form separately.
Credits
Thousands of students have given feedback and so contributed to this ebook’s design. Thank you!
The ebook’s chapters, programming assignments, and weekly bulletins have been written in Finnish and translated into English by Juha Sorva.
The appendices (glossary, Scala reference, FAQ, etc.) are by Juha Sorva unless otherwise specified on the page.
The auto-grading of the assignments has been developed by the following Aalto students (in alphabetical order): Riku Autio, Kai Bukharenko, Nikolas Drosdek, Kaisa Ek, Rasmus Fyhrqvist, Joonatan Honkamaa, Antti Immonen, Jaakko Kantojärvi, Onni Komulainen, Niklas Kröger, Kalle Laitinen, Teemu Lehtinen, Mikael Lenander, Ilona Ma, Jaakko Nakaza, Strasdosky Otewa, Kaappo Raivio, Timi Seppälä, Teemu Sirkiä, Onni Tammi, Joel Toppinen, Anna Valldeoriola Cardó, and Aleksi Vartiainen.
The illustrations at the top of each chapter and the similar drawings elsewhere in the ebook are the work of Christina Lassheikki.
The animations that detail the execution Scala programs have been designed by Juha Sorva and Teemu Sirkiä. Teemu Sirkiä and Riku Autio did the technical implementation, relying on Teemu’s Jsvee and Kelmu toolkits.
The other diagrams and interactive presentations in the ebook are by Juha Sorva.
The O1Library software has been developed by Aleksi Lukkarinen, Juha Sorva, and Jaakko Nakaza. Several of its key components are built upon Aleksi’s SMCL library.
The pedagogy of using O1Library for simple graphical programming (such as Pic) is
inspired by the textbooks How to Design Programs by Flatt, Felleisen, Findler, and
Krishnamurthi and Picturing Programs by Stephen Bloch.
The course platform A+ was originally created at Aalto’s LeTech research group as a student project. The open-source project is now shepherded by the Computer Science department’s IT services; the project has received contributions from dozens of Aalto students and others.
The A+ Courses plugin, which supports A+ and O1 in IntelliJ IDEA, is another open-source project. It has been designed and implemented by various students in collaboration with O1’s teachers.
For O1’s current teaching staff, see Chapter 1.1.
Additional credits appear at the ends of some chapters.

foreachtakes in a function that takes in a single element (here: anInt), such as the anonymous function that we have in this example.