Luet oppimateriaalin englanninkielistä versiota. Mainitsit kuitenkin taustakyselyssä osaavasi suomea. Siksi suosittelemme, että käytät suomenkielistä versiota, joka on testatumpi ja hieman laajempi ja muutenkin mukava.
Suomenkielinen materiaali kyllä esittelee englanninkielisetkin termit.
Kieli vaihtuu A+:n sivujen yläreunan painikkeesta. Tai tästä: Vaihda suomeksi.
Chapter 1.3: Numbers, Words, Sounds, and Pictures

Where Are We?
Now that you’ve got an overview of programming from the previous chapters, let’s start building some concrete skills, one small step at a time.
Here’s the short-term plan:
Between this chapter and 1.6, you’ll learn to use selected programming techniques and understand the concepts behind them. You’ll program by giving individual instructions to the computer, one by one. You’ll use the techniques as separate pieces: they don’t form an entire application yet.
In Chapters 1.7 and 1.8, you’ll learn to create commands of your own by combining existing ones.
From Chapter 2.1 onwards, we’ll put the pieces together and start building application programs. You’ll use all the techniques that you’ve learned.
One Plus One
Practically all programs require some basic arithmetic: addition, subtraction, multiplication, and/or division. For instance, the GoodStuff application from the previous chapter divides numbers to calculate value-for-money figures. Pong constantly computes new coordinates for the paddles and the ball while the game is running.
Scala, like other programming languages, gives us tools for working with numbers. For instance, here’s a Scala command that instructs the computer to compute one plus one:
1 + 1
Simple. But where should you write such a command?
One option would be to create an entire program that makes use of this command somehow and to save that program in a file. But there’s another option that’s often more convenient when we try out individual Scala commands:
The REPL
Let’s adopt a tool known as the REPL. Do this:
In the Project view on the left, select the module that you want to use the REPL with. For this chapter, use the GoodStuff module.
Press Ctrl+Shift+D, or select in the menu.
You should see a view that looks essentially like this. Please make sure that its title is REPL for GoodStuff.
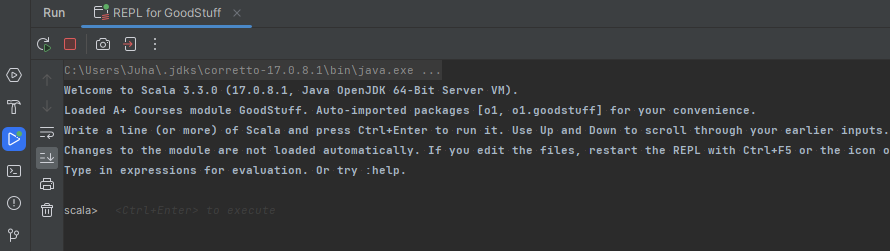
The REPL appears at the bottom of the IntelliJ window, in the Run tab. You can type Scala code at the
scala>prompt. Press Ctrl+Enter to execute the code you typed. The REPL reports the results below the prompt.
“REPL” is short for read–evaluate–print loop. Those words convey the basic idea:
read: You can type in bits of Scala code that the REPL receives as input, or “reads”.
evaluate: The REPL runs your code as soon as it receives it. For instance, if you type in an arithmetic expression, the REPL calculates a result.
print: The REPL reports the results of evaluation onscreen.
loop: This interactive cycle between the user and the REPL continues as long as you keep entering commands.
Go to the scala> prompt in the REPL. Enter 1 + 1, for example, and press Ctrl+Enter.
The output will be something like this:
1 + 1val res0: Int = 2
This is how the Scala REPL informs you that the result of the computation is two.
res0 comes from the word result and means “result
number 0” — that is, the first result obtained during this
REPL session. These numbers start from zero and count upwards,
which is typical in programming.
Int is the Scala name for integer numbers. Like many
programming languages, Scala uses terms based on English words.
For now, you can simply ignore the val (short for
value). Many REPL outputs begin with this word; later
you’ll learn why.
Ask the REPL to compute some more values. Each result appears after the previous one,
with a larger res number:
2 + 5val res1: Int = 7
1 - 5val res2: Int = -4
2 * 10val res3: Int = 20
15 / 3val res4: Int = 5
Feel free to experiment with other arithmetic operations too.
A practical hint
Press the up and down arrows on your keyboard. You’ll see that you can access and rerun the commands you entered earlier in the same REPL session. This is often convenient, if you want to repeat an earlier command without retyping it.
Spaces around operators
The spaces around the operators in our examples aren’t mandatory and don’t affect the values of the arithmetic expressions. Spaces do, however, make the code a bit easier to read (once we start working with larger amounts of code). It’s a good habit to include them.
The REPL vs. a whole program
In the previous chapter, we looked at the GoodStuff application. It was stored in files, which is why we could run and rerun the entire app at will. Writing the program code and running it were distinctly separate steps.
Working in the REPL is a bit different. The commands you enter there aren’t permanently stored anywhere. In the REPL, the there’s no separation between writing and running code: each command is executed as soon as you finish typing it in.
On Expressions
The examples above were simple, but they already involve a number of fundamental programming concepts that are essential to understand as we move forward. The most important of these is the concept of expression (lauseke).
For our purposes, it’s not necessary to define the concept formally. This will suffice: an expression is a piece of code that has a value (arvo).
So far, we’ve used arithmetic expressions, which get their values from mathematical
computations. For example, 1 + 1 is an expression — its value is the integer two.
Below is one more example in the REPL and a few more key concepts explained through the example. (Reminder: hover the mouse over a boxed explanation to highlight the corresponding code.)
50 * 30val res5: Int = 1500
Each of these subexpressions is also a simple expressions in its own right. They are pieces of code with a value. In our example, both of these expressions is a literal (literaali): a value that has been written “as is” into program code. You can tell the value of a literal simply by looking at it; for instance, the literal that consists of the characters five and zero has a value of fifty.
The REPL evaluates (evaluoida) the expressions you type in. Evaluating an expression produces its value, which the REPL reports.
Every value has a data type (tietotyyppi). The integer
type, Int, is one of the data types built into Scala.
It’s perfectly possible to enter just a literal as an input to the REPL, as shown below. Evaluating a literal couldn’t be much simpler: the literal’s value is exactly what it says on the tin:
123val res6: Int = 123
Already in this chapter — and more so in subsequent ones — you’ll encounter data
types other than Int, operators beyond basic math, and expressions that go beyond
literals and arithmetic.
Dividing Numbers
For the most part, Scala’s arithmetic works like you’d expect from mathematics. However, there are some things that may surprise you.
Experiment with division. Try these, for instance:
> 15 / 5
res11: Int = 3
> 15 / 7
res12: Int = 2
> 19 / 5
res13: Int = 3
(Side note: Above, and from this point on, we don’t always show the full
scala> prompt or the val in output in each REPL
example. So don’t be flustered if the printouts in the ebook don’t exactly
match what you see in your own REPL — the important parts are the same.)
What if I want to round numbers “right”?
Scala’s way of handling integers is common in programming languages. You might be surprised how often it’s convenient that integer division works that way.
There are tools for your other rounding needs. We’ll run into them later (e.g., in Chapter 5.2).
Operator Precedence and Brackets
Some operators have precedence over others — they are evaluated first. The rules for arithmetic operator should be familiar from mathematics. Multiplication is evaluated before addition, for instance:
1 + 2 * 3res0: Int = 7
5 * 4 + 3 * 2 + 1res1: Int = 27
You can use round brackets (parentheses) to influence evaluation order. This, too, has a familiar feel:
(1 + 2) * 3res2: Int = 9
5 * ((4 + 3) * 2 + 1)res3: Int = 75
A parenthetical warning
In school math, you may have used a different kinds of brackets nested inside each other. For instance, you may have written square brackets around round ones just for clarity, with both kinds meaning the same thing.
That won’t work in Scala code.
In Scala, round brackets are used for grouping expressions (and a few other things). Square or curly brackets won’t do for that purpose. Those other brackets have other uses, and we’ll get to that in due time.
Scala is a typical programming language in this regard. In programming, different kinds of brackets usually have different meanings.
On Decimals
What about decimal numbers?
They mostly work just as you might expect. In Scala, the dot is used as the decimal mark, just like they do in most English-speaking countries:
4.5res4: Double = 4.5
2.12 * 3.2205res5: Double = 6.82746
4.0res6: Double = 4.0
As you can see above, “decimal numbers” go by the name Double in Scala. The type
is oddly named for historical reasons.
When you use values of type Double, division works more like how you might expect.
Dividing a Double by a Double yields a result that is also a Double:
999.0 / 1000.0res7: Double = 0.999
Combining numerical types
You can mix Double and Int values in the same expression:
29 / 10res8: Int = 2
29.0 / 10res9: Double = 2.9
29 / 10.0res10: Double = 2.9
30.0 / 10.0res11: Double = 3.0
If one of the operands is an integer and one is a decimal number, the result is a decimal number. That applies even if the result is equal to an integer.
What about more complex expressions that mix different kinds of numbers? Say,
(10 / 6) * (2.0 + 3) / 4.
Here, the operators and parentheses affect the evaluation order of subexpressions. That order also determines the type of each intermediate result. Can you work out the value of that expression?
To check your thinking, see this interactive animation:
Computer memory and this ebook’s animations
A computer’s memory can store vast amounts of data, all in the form of bits. As a program runs, it reserves parts of this memory for various purposes. Each part of memory has its own unique address: a kind of running number that identifies the particular location in memory.
In this introductory course, we won’t go into the bit-level details of how memory works — we won’t need that information. Still, even beginners (like you, we presume) can greatly benefit from having a general idea of what gets stored in memory and when. That’s why we use animated diagrams like the one above, which show how running a program affects memory. The “areas” in the diagrams represent parts of computer memory that have been reserved for different purposes.
The first animation above was very simple, and you might have understood the expression just fine even without it. Nevertheless, it’s a good idea to get familiar with this graphical way of representing how programs run. Later on, we’ll be using similar animations to illustrate phenomena that are considerably more complex.
Strings of Characters
In addition to numbers, most programs need to manipulate text, too. Let’s try it:
"Hi"res12: String = Hi
"Hey, there's an echo!"res13: String = Hey, there's an echo!
As the REPL tells us, data like this is represented in Scala
by the String type. A string (merkkijono) is basically
a chunk of text or a similar sequence of characters.
A string literal is a string written directly into program
code (cf. the Int and Double literals above). String literals
go in double quotation marks as shown.
(Thinking back to the previous chapter, you may recall another string literal: the quoted bit in GoodStuff with the typo.)
If you forget the quotation marks, and you’ll probably get an error message. That’s because the REPL will try to interpret what you typed as a Scala command:
Hi-- Error:
  |Hi
  |^^
  |Not found: Hi
A Command for Printing
The REPL reports the value and type of each expression, which is handy. But what if we
wish to output something other than resX: SomeType = value?
Scala’s println command gives us control over the output:
println("Greetings!")Greetings!
println(123)123
println(-5.2)-5.2
Even though these commands are pretty straightforward, there are several Scala features here that are worth noticing:
Each of these commands starts with its name.
Generally, the names of commands reflect what
the command does. In this case, we print a
line of text: Scala’s println is short for
print line.
Round brackets follow the name. It isn’t customary to put spaces around them. (But you may, without affecting what the code does.)
Inside the round brackets, you write the command’s
parameter expressions (parametrilausekkeet),
which refine the command. In our example, each
println command is given a single parameter
expression that specifies what the command
should print out.
(The word “print” might make non-programmers think of the sort of printers that churn out paper. But programmers also use this word about onscreen text output.)
A parameter expression doesn’t have to be just a literal. For example, consider this command:
println("Programming" + (100 - 99))
The animation below portrays what happens when that code is executed.
As you saw, the execution progressed “from inside the brackets outwards”. This rule of thumb holds in many situations. The parameter expressions inside the round brackets get evaluated first, producing parameter values (parametriarvo) that are then passed to the command.
An argument about terminology
Some other texts on programming use the term “argument” to refer to either what we’ve called “parameter expressions”, or what we’ve called “parameter values”, or both. For further comments on this, see argument in our course glossary.
Another command for printing
In addition to println, there is a print command. It works the
same, except that it doesn’t change lines at the end. In the REPL,
you can see the difference by entering multiple commands at once.
Compare:
println("cat")
println("fish")cat
fish
print("cat")
print("fish")catfish
println is used more frequently than print, both in
general and in O1.
Try This Too
Type println(1 + 1 in the REPL, like so:
println(1 + 1
No matter how you keep hitting Ctrl+Enter, nothing much seems to happen. Is the REPL stuck?
No, it isn’t. The problem is that there’s a closing bracket missing. The REPL interprets this as an incomplete command and expects you to finish it.
Add the missing character and try again. The REPL resurrects.
So keep that in mind. If you mistype something, that might happen, but the fix is easy.
A Stringed Instrument
We can use strings of characters to represent text, but strings are useful for representing other things as well. Like music.
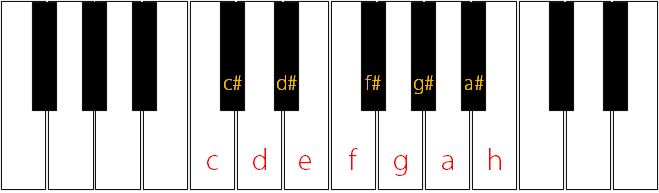
Below is a print command that outputs a few notes from Ukko Nooa (“Uncle Noah”), a simple song that many Finnish children learn when they first take up the piano, as evidenced on YouTube. We represent notes as letters that correspond to the keys of a piano, as shown in the picture above.
println("cccedddf")cccedddf
That was none too exciting. It would be more rewarding to play the notes than just print them.
Let’s pick up another command. Unlike println, which is part of the Scala’s basic
toolkit, the command we use next, play, was created especially for this course. This
command adds a bit of life to some of our programs.
(The play command is defined in O1Library, which you should have downloaded into
IntelliJ in Chapter 1.2. If you didn’t, do that now and restart your REPL.)
Try this:
play("cccedddf")
The command produces no visible printout. Instead, it plays the notes listed in its
String parameter on a virtual piano. Did you have sounds enabled on your computer?
Try passing other strings as parameters to play, too. For instance, you can include
spaces, which play interprets as pauses:
play("cccdeee f ffe e")
And hyphens, which play interprets as longer notes:
play("cccdeee-f-ffe-e")
Sound in O1
Here and there, we’ll make use of sound, as we just did. Naturally, this will work only if you have sounds enabled on your computer.
If you study among other people, remember to bring headphones.
If you have no headphones or have a hearing impediment, no
worries. You can then use println instead of play. A few
sections of this ebook will a bit less fun, but your course
performance won’t suffer.
We don’t require O1 students to have musical ability.
A note about notes
play uses “European” names for notes. That means that what’s
called a B note
in many English-speaking countries is called H instead. Here’s an
example:
play("cdefgah")
The character b denotes flat notes. This plays an E-flat, for
instance:
play("eb")
If you like, you can use the character ♭ instead of b.
Strings attached
With numbers, + stands for addition. However, the operator has a different meaning when
strings are involved. You can use it to put strings together:
"apple" + "pen"res14: String = applepen
"REPL with" + "out" + " a cause"res15: String = REPL without a cause
Spaces inside quotation marks matter. They affect the result.
The same operator works fine even in a parameter expression:
println("Uncle Noah, Uncle Noah," + " was an upright man.")Uncle Noah, Uncle Noah, was an upright man.
play("cccedddf" + "eeddc---")
String multiplication
Another way to change octaves
In addition to using < and > to shift octaves, play also
lets you mark an octave number for any individual note. You may
use octave numbers from 0 to 9; the default octave is number 5.
For instance, these two commands produce the same result:
play(">cd<<e")play("c6d6e4")
This is unimportant as such, since it’s specific to a particular
music-playing command created for the purposes of this course.
But if you choose to mess around with play just for fun, you
may sometimes find it handy to mark octaves as numbers.
Pictures and Packages
In GoodStuff, a picture of a grinning face marks the favorite experience. In Pong, the paddles are pictures of rectangles and the ball as a picture of a circle. Programs manipulate pictures.
Displaying a picture
Let’s use Scala to load an image from the internet. Try this:
Pic("https://tinyurl.com/AeolusByASorva")res16: o1.gui.Pic = https://tinyurl.com/AeolusByASorva
Note the capital P. Pic is the name of a data type for
representing images, and it’s spelled in upper case just
like String and Int are.
We pass an internet address as a parameter. We represent the address as a string literal, so we enclose it in quotation marks.
The package name o1 indicates that we’re using another tool
created for this course. Not to worry, though: as you use these
tools, you are sure to pick up general principles that are useful
outside O1 as well.
We get a value of type Pic that holds the image data loaded
from the net.
So, where did that get us? The image is now stored in your computer’s memory, but
we didn’t get to see it. One easy way to display an image is the show command,
which works for pictures much like play did for sounds. For example:
show(Pic("https://tinyurl.com/AeolusByASorva"))
The image appears in a separate little window in near the top-left corner of your screen. To close it, click the window or press Esc.
In the above example, we loaded the picture from the net. You can also load an image from a file stored on your computer’s disk drive. Like so:
show(Pic("d:/example/folder/mypic.png"))
You can pass in a path to a local image file. (This is just an example path to a file that could be located on someone’s computer. If you try the code, replace that with a path to some existing image file on your computer.)
It’s often not necessary to write the full path. If the image file is located within an
active module, there is a simpler way. Assuming you launched the REPL in the GoodStuff
module, the following will also work, because face.png is a file within that module.
show(Pic("face.png"))
Colored shapes
The Pong game is an example of a program that uses familiar geometric shapes for its graphics. O1Library gives us tools for defining shapes in different colors. Let’s play with these tools a bit.
Let’s start with colors. You can refer to common colors by their English names:
Blueres17: o1.gui.Color = Blue
Greenres18: o1.gui.Color = Green
DarkGreenres19: o1.gui.Color = DarkGreen
Colors have the type Color.
Let’s use the circle command to create a blue circle:
circle(200, Blue)res20: o1.gui.Pic = circle-shape
Two parameter expressions go in round brackets: the circle’s size and color.
The command creates an image of a circle whose diameter is 200
“picture elements”, commonly known as pixels. This image,
too, has the Pic data type.
Any value of type Pic is a valid parameter for show. Instead of loading an image from
the net or your computer, you can show a circle whose attributes you define as Scala code:
show(circle(200, Blue))
Experiment with other colors and shapes. For instance, here’s a rectangle, and its friend, and an isosceles triangle:
show(rectangle(200, 500, Green))show(rectangle(500, 200, Red))show(triangle(150, 200, PhthaloBlue))
About the REPL
Perhaps you’ve wondered whether the REPL is just for beginners, not for serious professionals.
No, it isn’t.
Many professionals, too, use a REPL to experiment and sketch out solutions. Besides, even serious professionals are students when they are learning new programming languages and when they study code written by others.
Complex program components can be used in the REPL, too, such as the parts of an application. Even though we haven’t done much coding yet, you can already use the REPL to experiment with a component of an existing program. Try the following if you want.
The GoodStuff GUI in the REPL
In the previous chapter, you launched the GoodStuff GUI from the IntelliJ menu. You can also display the GUI window by entering the following commands in the REPL.
(For this to work, you need to have launched the REPL within the GoodStuff module. For that to happen, make sure you have selected GoodStuff in the Project view or have one of the module’s files active in the editor when you hit Ctrl+Shift+D.)
val testWindow = CategoryDisplayWindow(Category("Hotel", "night"))
testWindow.visible = true
Here’s a brief explanation: This is how we tell the computer to create a new category of experiences for hotels (or whatever you choose, if you replace the string literals with something else) and a new GUI window for recording such experiences.
The exact meaning of this example will become clearer after the first couple of weeks of O1.
Summary of Key Points
You can combine integers (
Int), decimal numbers (Double), and arithmetic operators to form arithmetic expressions.An expression is a piece of code that has a value. To evaluate an expression is to determine the expression’s value.
You can use the type
Stringto form expressions whose values are strings of characters, such as text.You can use the
printlncommand to output strings or other values.The
o1package gives us tools for playing notes (play) and working with images (Pic,show,circle,Red, etc.).The REPL environment is great for experimenting with programming techniques, testing ideas, and learning.
In the first weeks of O1, you’ll find out how to use the basic data types and expressions from this chapter to build GoodStuff and other applications.
Links to the glossary: REPL; expression, value, to evaluate, literal; operator; data type; string; to print; parameter expression, parameter value (or argument).
Below is a diagram of the most important concepts that we’ve covered and their main relationships. We’ll add to this diagram later.
Learn the concepts in this chapter!
Many of the terms and concepts introduced in this chapter are central to O1. Not just for their own sake, but because you they help you make sense of programming in general.
Knowing the terminology will help you read this ebook and communicate with other programmers (such as your student pair or the teaching assistants).
Pay particular attention to the concepts in the diagram above.
But it’s even more important that...
... you get a feel for programming in practice. The REPL is great for this. Don’t hesitate to try things in the REPL, including things that aren’t specifically suggested in these chapters.
Feedback
Please note that this section must be completed individually. Even if you worked on this chapter with a pair, each of you should submit the form separately.
Credits
Thousands of students have given feedback and so contributed to this ebook’s design. Thank you!
The ebook’s chapters, programming assignments, and weekly bulletins have been written in Finnish and translated into English by Juha Sorva.
The appendices (glossary, Scala reference, FAQ, etc.) are by Juha Sorva unless otherwise specified on the page.
The auto-grading of the assignments has been developed by the following Aalto students (in alphabetical order): Riku Autio, Kai Bukharenko, Nikolas Drosdek, Kaisa Ek, Rasmus Fyhrqvist, Joonatan Honkamaa, Antti Immonen, Jaakko Kantojärvi, Onni Komulainen, Niklas Kröger, Kalle Laitinen, Teemu Lehtinen, Mikael Lenander, Ilona Ma, Jaakko Nakaza, Strasdosky Otewa, Kaappo Raivio, Timi Seppälä, Teemu Sirkiä, Onni Tammi, Joel Toppinen, Anna Valldeoriola Cardó, and Aleksi Vartiainen.
The illustrations at the top of each chapter and the similar drawings elsewhere in the ebook are the work of Christina Lassheikki.
The animations that detail the execution Scala programs have been designed by Juha Sorva and Teemu Sirkiä. Teemu Sirkiä and Riku Autio did the technical implementation, relying on Teemu’s Jsvee and Kelmu toolkits.
The other diagrams and interactive presentations in the ebook are by Juha Sorva.
The O1Library software has been developed by Aleksi Lukkarinen, Juha Sorva, and Jaakko Nakaza. Several of its key components are built upon Aleksi’s SMCL library.
The pedagogy of using O1Library for simple graphical programming (such as Pic) is
inspired by the textbooks How to Design Programs by Flatt, Felleisen, Findler, and
Krishnamurthi and Picturing Programs by Stephen Bloch.
The course platform A+ was originally created at Aalto’s LeTech research group as a student project. The open-source project is now shepherded by the Computer Science department’s IT services; the project has received contributions from dozens of Aalto students and others.
The A+ Courses plugin, which supports A+ and O1 in IntelliJ IDEA, is another open-source project. It has been designed and implemented by various students in collaboration with O1’s teachers.
For O1’s current teaching staff, see Chapter 1.1.
Additional credits for this page
The Aeolus photo from the Pic example is by Antti Sorva, the O1 teacher’s dad.

An arithmetic expression consists of subexpressions connected by arithmetic operators (operaattori). Here, we used the multiplication operator
*.