Getting Started with Rubyric
- Main questions:
How to create courses and assignments in Rubyric? How they can be linked to A+?
- Topics?
Creating and modifying courses, course instances and assignments.
- Difficulty:
Easy
- Laboriousness:
An hour at most
Set up Rubyric locally
If you want to test Rubyric locally, you must follow the instructions on how to set up a Rubyric locally along with A+, presented in the Official Rubyric documentation. It is also worth mentioning that currently setting up Rubyric locally can be slightly difficult, and there may be some problems that will require you to solve some dependency issues. Therefore, we recommend reading the Troubleshooting section when setting up Rubyric on your computer.
But, if you do not want to spend too much time setting up Rubyric locally, you could also test the Rubyric directly in a testing server, e.g. https://minus.cs.aalto.fi for the Aalto CS department, and verify that the exercises connect to Rubyric.
Configure course at Rubyric
Create course and course instance
Creating a new course in Rubyric automatically also creates a new course instance for the course. There can be several course instances for a course: if the course is taught every year, each year can be its own instance. Each course instance have their separate assignments, reviewers and students. The instructors of the course are persons who have rights to all the instances of the course.
To create a new course and course instance follow these steps:
Login to Rubyric
Press "Create new course" button at frontpage or go to https://rubyric.cs.hut.fi/course_instances/new
Fill in the form and click "Create"
"Create new course" button is not visible if you have previously only used Rubyric as a student or as an assistant. If this is the case you need to use the link to access the create course form.
The form asks for Course name, Course instance name, Interface language and Submission policy. Interface language affects on the language some instructions are shown to course instructions and assistants.
Submission policy defines who are allowed to submit to assignments:
"Anybody can submit without authentication" allows students to submit without logging in after providing their email address. This can be useful on MOOCs.
"Any authenticated user can submit" requires students to login before allowing them to submit.
"Only enrolled students can submit" requires the instructor to provide list of students who are allowed to submit.
"LTI integration" is used in LTI and A+ connected courses. If you wish to connect the course to A+, choose this option.
To configure A+ connected course you have two choices.
(Recommended) The first option:
Login to Rubyric through A+
If the course has not yet been configured at Rubyric, you will be redirected to create course form
Fill in the course and course instance names and click "Create"
The form already has LTI consumer ID and LTI context ID filled in, do not touch them.
The second option:
Login to Rubyric
Press "Create new course" button at frontpage or go to https://rubyric.cs.hut.fi/course_instances/new
Fill in the course and course instance names and choose "LTI integration" as Submission policy
Fill in the LTI consumer ID and LTI context ID and click "Create"
Click the Rubyric menu item at A+
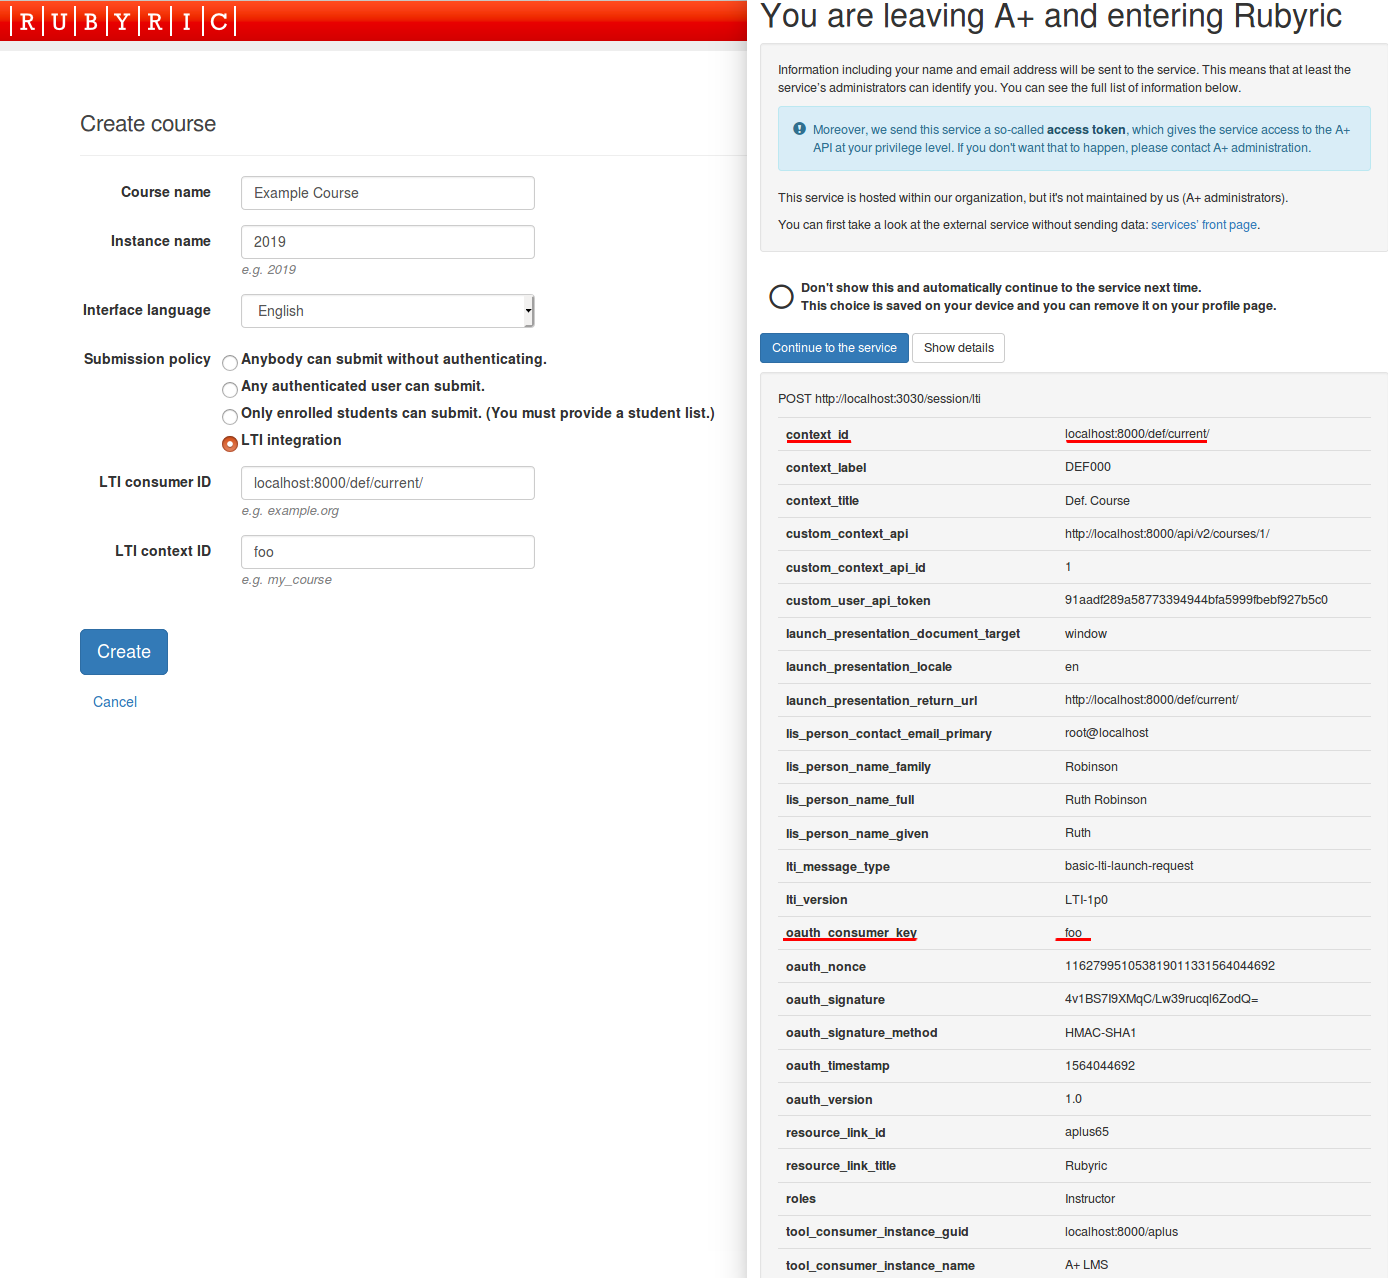
Click "Show details" and fill the form at Rubyric with values from details (see the image)
LTI consumer ID:
oauth_consumer_keyLTI context ID:
context_id
If you are redirected straight to Rubyric instead of having chance to
choose "Show details", or you do not want to include the LTI login,
you can try using plus.cs as LTI consumer ID and the address of your course
plus.cs.hut.fi/something/something/ as the LTI context ID. Notice the missing
https:// at the beginning and the slash / at the end.
To create a new course instance to existing course, navigate to course by clicking its name on the front page and click on "Create new course instance". If you want to connect a new course instance to A+ follow the second option's instructions to fetch the LTI consumer ID and LTI context ID values.
Warning
If the LTI login directs you to create course form again after you have configured an LTI course, there is probably some mistake in LTI context ID or the LTI consumer ID, and you should fix them by updating course instance (see below).
Updating the course
You can change the course settings going to the front page of the course on Rubyric, clicking the link Settings under Course at the menu on the left. The settings of the course instance are in the same menu below the corresponding title Instance.
At the course settings page you can change the name of the course, as well as the contact email, the course code and the time zone. At the course instance settings page you can change the name, the language and the submission policy of the course instance. You can also switch the course instance to inactive so that it won't accept any more submissions.
Creating an assignment
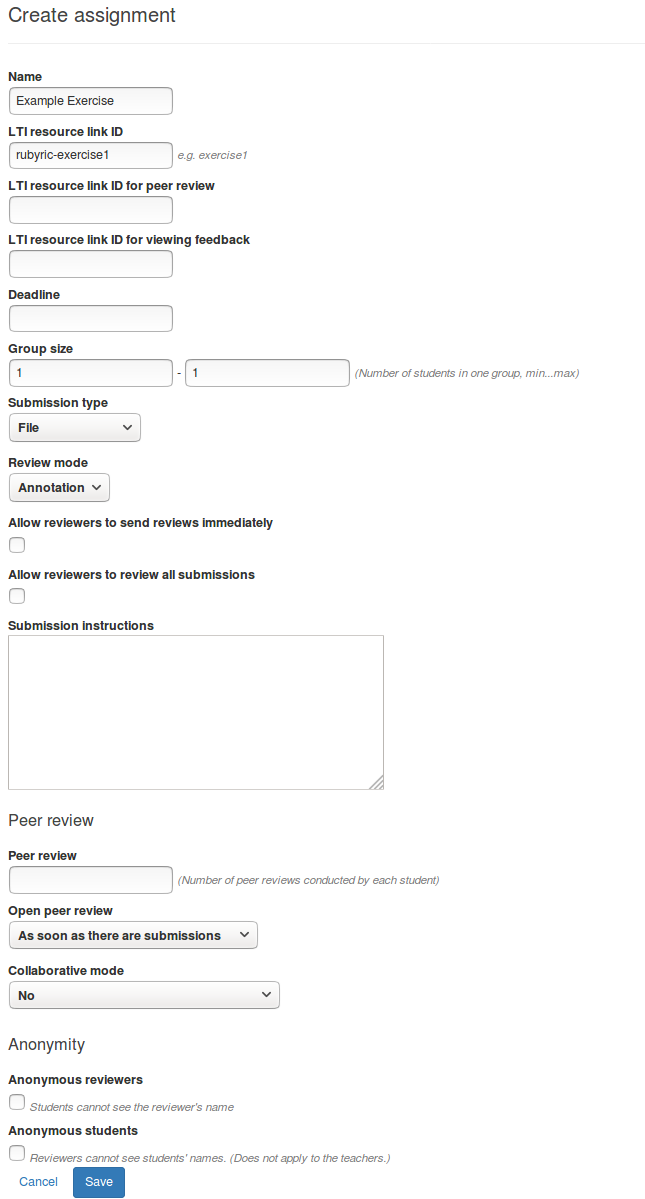
Click the name of the course instance at the course front page. Now Rubyric shows the list of the assignments for this course instance. Click on Create new assignment button to create a new assignment. Fill in the form.
Each assignment must have a unique name. You can define a deadline for the exercise. Students can submit to assignment even after defined deadline, but late submissions will be shown red for reviewers.
The Group size settings defines the size of group (persons) allowed to make submissions. The Submission type affects what kind of submissions Rubyric asks for from students. You can choose submissions to be made as files, written in text area or both together.
Review mode affects on what kind of reviews will be done. More about reviews on Rubrics and reviews. If you cross "Allow reviewers to send reviews immediately", reviewers are allowed to send reviews back to students right after finishing review. Otherwise instructors will have to send reviews afterwards. Crossing "Allow reviewers to review all submissions" allows reviewers to view and review any submission in the exercise. Otherwise reviewers are only allowed to review submissions from groups assigned to them. Rubyric also allows students to conduct peer reviews. If peer review count is left empty, no peer review is expected. On the other hand collaborative mode allows students to construct feedback for each other but they are not required to review other people's submissions.
Check out the chapter LTI configuration in A+ to find out how to configure an LTI exercise in A+. After configuring the exercise at A+ you still need to configure it at Rubyric. It can be done automatically or manually.
Automatic exercise configuration through A+:
Create a new A+ exercise using Rubyric as LTI service. The following snippet shows the code used in the First example presented in the example section. As you can see, the
:lti: Rubyricvalue is required to identify the service that is going to be used, the:lti_aplus_get_and_post:must be added to connect to Rubyric since Rubyric since Rubyric does not support LTI, finally, the:url: /aplus_exerciseis specific to Rubyric and it makes Rubyric create the exercise automatically so that the teacher does not need to manually create any exercises in Rubyric beforehand. If the exercises are created beforehand, then the URL must hard code the id value.Rubyric submit directive¶.. submit:: rubyric_example 10 :title: Rubyric example :lti: Rubyric :lti_aplus_get_and_post: :url: /aplus_exercise
Open the exercise at A+
Opening the exercise configures it at Rubyric if it has not yet been done
(Optional) Login to Rubyric and change exercise settings to your liking
Do not touch LTI resource link ID
To configure the exercise manually you need to set LTI resource link ID at Rubyric to be same as it is in A+ exercise. You don't have to fill in LTI resource link ID for peer review and LTI resource link ID for viewing feedback unless you want to use Rubyric's peer review or want students to view the feedback at Rubyric. You need to set Service url at A+ to service url shown at exercise page at Rubyric after you have created the Rubyric exercise.
The configuration has been successful if you can see the submit button when opening the exercise at A+.
Submissions
Once you have configured exercise in both A+ and Rubyric, submissions should be delivered to Rubyric where they can be assessed.
If you want students to submit straight to Rubyric, you can provide students with submission url which they can use. Submission url is shown at assignment page.