Create Acos exercises
- Main questions:
How to create and test Acos exercises locally?
- Topics:
In this section, we will talk about:
- Requirements:
You need intermediate to advanced computing and programming skills.
Prior knowledge about npm packages, JSON, HTML, and JavaScript may be beneficial.
Downloadthe images and code files used in this chapter.
- Estimated working time:
60-90 min.
Introduction
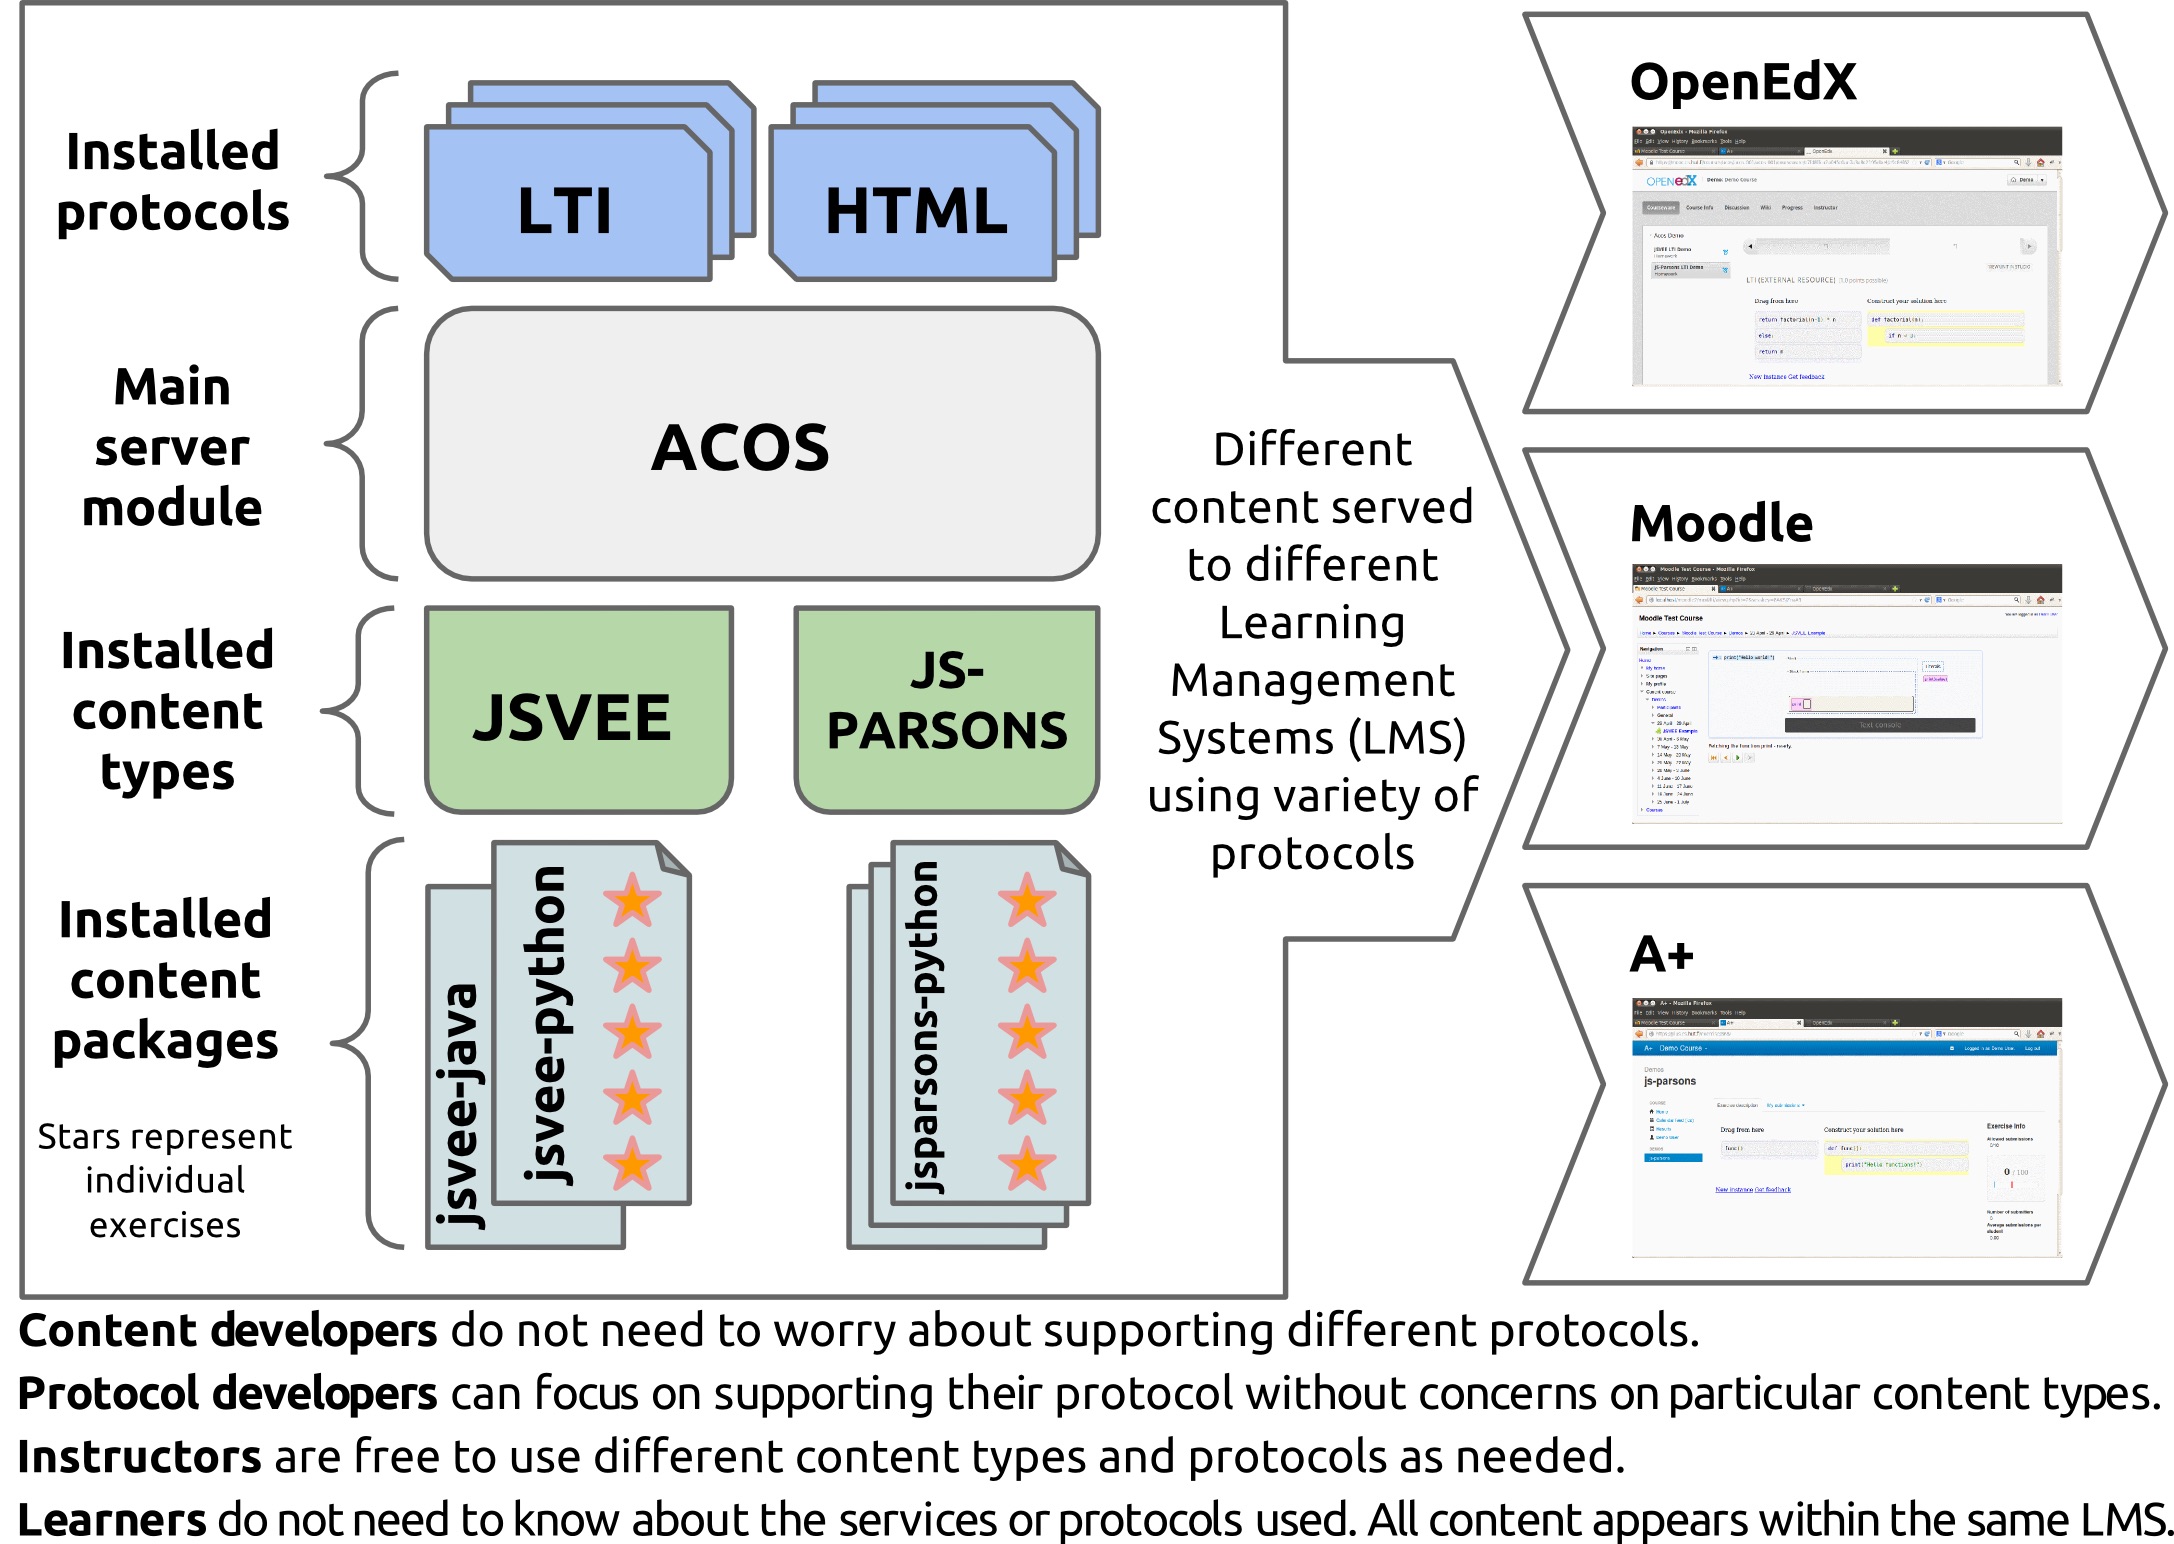
Acos exercises are basically an npm package which, if desired, it can be published publicly under the npm package manager environment or simply published privately for your own course. Acos exercises are grouped under the "Acos content packages" as is shown in the Acos environment. In order words, the Acos content packages are basically a container for the Acos exercises, which are presented as activities to the end-user.
In this chapter, we will show you how to create a "drag and drop" exercise. Notwithstanding, the concepts as well as the ideas presented in this chapter are reproducible for creating other types of Acos exercises.
Acos server Team, (2016), Acos architecture [ONLINE]. Available at: https://www.npmjs.com/package/acos-server [Accessed 13 May 2020].
Create an Acos exercise
Usability aspects
Create an exercise is relatively easy. Basically, you only need to create an HTML file, add the content you would like to have and finally create a JSON configuration file with the drag and drop settings. However, the most challenging part is to design the flow and the appearance of your exercises.
Hint
If you want to look for inspiration, you can review some of the exercises that has been used in some of the A+ courses.
Unfortunately, we cannot give you suggestions about the usability and the optimal flow of your exercises. Yet, we can provide you with a list of tools that may help improve the appearance of the Acos exercises. First, we suggest using a CSS framework for styling your activities such as Bootstrap, Material, or Foundation. Secondly, we suggest making use of the style editor embedded in your web browser. Finally, we suggest researching about usability, especially usability related to the exercise you are developing. In this case, we should read about the main considerations needed while using drag and drop elements.
Read more about How to use the web inspector
Set up your new Acos content package
Creating Acos exercises only requires you to follow a couple of steps. First, download one of the Acos content packages examples, published under the Acos GitHub organization. In this case, we are going to use the drag and drop example. Secondly, read the documentation related to the content type under which you are going to work. In this case, read the Acos drag and drop documentation. Thirdly, edit the source code and create your own Acos content package. Fourth and last, publish your exercises.
The process of creating Acos exercises looks quite straightforward. However, we have some steps in between that need to be considered. But do not worry, we will explain those steps in more detail in the following sections of this chapter. For now, let's start configuring the Acos content package of the drag and drop example.
Open the
package.jsonfile and change the name of the package. Remember to keep the content type name at the beginning, in this case, draganddrop- is the name of the package. Therefore, you will have something likedraganddrop-<name-of-your-acos-content-package>.Change the meta-information declared in the
index.coffeefile (name, description, author, version and some other information that you consider relevant).Change the namespace of the package declared in the
index.coffeefile. Again, remember to keep the content type name at the beginning. Therefore, you will have something likedraganddrop-<name-of-your-acos-content-package>.Change the name of the module from
DragandDropExampleto whichever name you prefer for your exercise, e.g.,DragandDropDataManagement.
After making all the changes mentioned above, your index.coffee should look something like the image below.
Note that in this example, we did not change the meta-information, but you should change it.
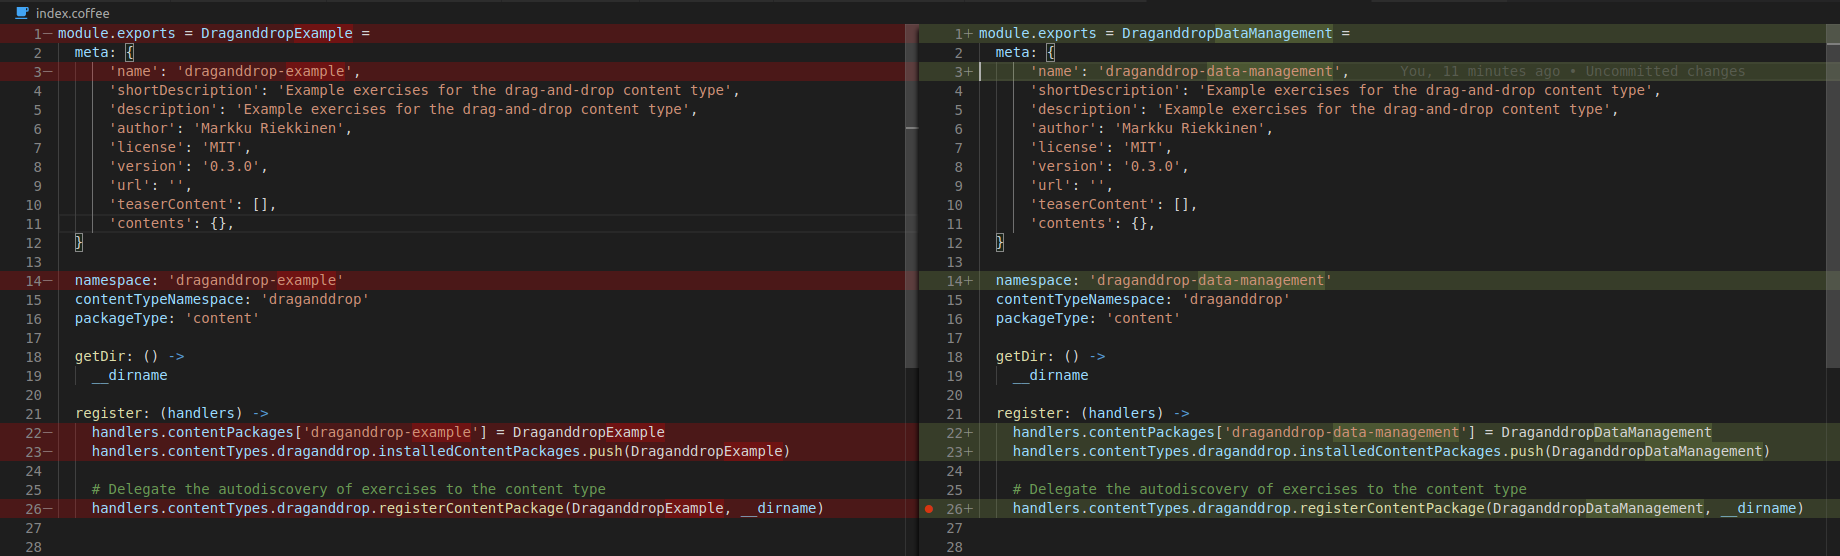
Diff view. Original file (left) and edited one(right).
Now that you have edited some of the source files, you can proceed to install the coffeescript module and compile the
index.coffee file. Therefore, you should run the following command in your project directory.
npm install
Verify that a node_modules folder and the index.js file are created. If the index.js file is not created, you should
run the following command in your project directory.
npm run prepare
Now, if you want to visualise the drag and drop example in your web browser, you should follow the instructions provided in the Test Acos activities locally or the Test Acos activities with Docker sections.
Create your own Acos exercise
Now that your project has been properly set up, it is time to start creating your own exercise. In this chapter, we will create a mock
data management exercise so that you could follow the process of creating Acos exercise step-by-step. Remember that all the
exercises you want to create should be located inside the exercises folder. You can also group them and organise them in
subfolders. For example, in the current exercises folder, there is an images folder and an articles folder containing
specific exercises.
For now, let's delete all the current examples and the related static files. Once, the exercises folder is empty we will start
creating new XML and JSON files. In this case, we will name the exercises data_structure. Therefore, we will have
two files:data_structure.xml and data_structure.json. Remember, that the name of those files should NOT CONTAIN
hyphens and it is preferred to use an underscore to separate words in the name of the files. Finally, we will add our images to
the static folder, and as an end result, we should have a project structure like the one
shown below.
.
├── exercises
│   ├── data_structure.json
│   └── data_structure.xml
├── index.coffee
├── index.js
├── LICENSE
├── node_modules
├── package-lock.json
├── README.md
└── static
    ├── data_folder.png
    ├── date_folder.png
    ├── exp_folder.png
    ├── file.png
    ├── link_folder2.png
    ├── link_folder.png
    ├── project_folder.png
    ├── readme.png
    ├── scripts.png
    └── src_folder.png
Now, it is time to add some content to our XML and JSON files. We will not go into detail about the syntax we used on this particular example. Nevertheless, you can find more information about the drag and drop syntax in the official documentation.
For now, the only thing we need to know is that the drag and drop exercises need one XML file and one JSON file. The XML
file contains HTML tags which define the view of the exercise, on the other hand, the JSON file contains the configuration of
the of the draggable files, the droppable placeholders defined in the XML file, and the feedback. The code below show how the
data_managment mock exercise is implemented. As you can observe, the data_structure.xml file
define the structure of the exercise view and the placeholders of the droppables. On the other hand, the
data_structure.json file, has declared the configuration and behaviour of the draggables.
  1<html>
  2  <head>
  3    <style>
  4  body {
  5    margin-left: 5px;
  6    font-family: -apple-system,BlinkMacSystemFont,"Segoe UI",Roboto,
  7    "Helvetica Neue",Arial,sans-serif,"Apple Color Emoji","Segoe UI Emoji",
  8    "Segoe UI Symbol";
  9    font-size: 16px;
 10    font-weight: 400;
 11    line-height: 1.6;
 12    color: #212529;
 13    text-align: left;
 14    background-color: #fff;
 15  }
 16  table, th, td {
 17    border: none;
 18  }
 19  table {
 20    margin-bottom: 0.5em;
 21  }
 22  img {
 23    max-height: 80px;
 24    width: auto;
 25  }
 26  .droppable {
 27    height: 80px;
 28    min-width: 80px;
 29    display: inline-block;
 30    overflow: hidden;
 31  }
 32  .folder-link {
 33    height: 80px;
 34    display: table-cell;
 35    vertical-align: middle;
 36  }
 37  </style>
 38  </head>
 39  <body>
 40    <h1>How do we manage multiple versions of data files?</h1>
 41    <p>Before start working on this exercise, review the
 42      <a href="https://www.youtube.com/watch?v=3MEJ38BO6Mo">Data Management lecture</a>.
 43    </p>
 44    <p>This exercise requires you to organise the project folder in the best possible manner
 45    by dragging and dropping the files and folder into the correct space.</p>
 46    <table>
 47      <thead>
 48        <tr>
 49          <th colspan="4">The "Big Picture" project</th>
 50        </tr>
 51      </thead>
 52      <tbody>
 53        <tr>
 54          <td>
 55            <img src="/static/draganddrop-data-management/project_folder.png" alt=""/>
 56          </td>
 57          <td></td>
 58          <td></td>
 59          <td></td>
 60        </tr>
 61        <tr>
 62          <td>
 63            <img src="/static/draganddrop-data-management/link_folder2.png" alt=""/>
 64          </td>
 65          <td>{source:}</td>
 66          <td>
 67            <img src="/static/draganddrop-data-management/scripts.png" alt=""/>
 68          </td>
 69          <td></td>
 70        </tr>
 71        <tr>
 72          <td>
 73            <img src="/static/draganddrop-data-management/link_folder2.png" alt=""/>
 74          </td>
 75          <td>{experiments:}</td>
 76          <td>
 77            <img src="/static/draganddrop-data-management/date_folder.png" alt=""/>
 78          </td>
 79          <td>{files:}</td>
 80        </tr>
 81        <tr>
 82          <td>
 83            <img src="/static/draganddrop-data-management/link_folder.png" alt=""/>
 84          </td>
 85          <td>
 86            <img src="/static/draganddrop-data-management/data_folder.png" alt=""/>
 87          </td>
 88          <td>{readme:}</td>
 89          <td></td>
 90        </tr>
 91        <tr>
 92          <td></td>
 93          <td>
 94            <img src="/static/draganddrop-data-management/link_folder.png" alt=""/>
 95          </td>
 96          <td>{date_folders:}</td>
 97          <td>{files:}</td>
 98        </tr>
 99        <tr>
100          <td></td>
101          <td></td>
102          <td>
103            <img src="/static/draganddrop-data-management/link_folder.png" alt=""/>
104          </td>
105          <td>{readme:}</td>
106        </tr>
107      </tbody>
108    </table>
109  </body>
110</html>
 1{
 2  "draggables":{
 3    "source":{
 4      "content":"<img src=\"/static/draganddrop-data-management/src_folder.png\" alt=\"folder\">",
 5      "reuse":false,
 6      "feedback":{
 7        "folder":"Correct!, this folder contains the source files.",
 8        "DEFAULT":"This folder only contain the source files."
 9      }
10    },
11    "date_folder":{
12      "content":"<img src=\"/static/draganddrop-data-management/date_folder.png\" alt=\"folder\">",
13      "reuse":false,
14      "feedback":{
15        "folder":"Correct!, this folder contains information organised by date",
16        "DEFAULT":"This folder contains information organised by date."
17      }
18    },
19    "experiment":{
20      "content":"<img src=\"/static/draganddrop-data-management/exp_folder.png\" alt=\"folder\">",
21      "reuse":false,
22      "feedback":{
23        "folder":"Correct!, this folder contain the results of different experiments",
24        "DEFAULT":"This folder contains the results of different experiments."
25      }
26    },
27    "file":{
28      "content":"<img src=\"/static/draganddrop-data-management/file.png\" alt=\"folder\">",
29      "reuse":true,
30      "feedback":{
31        "folder":"Correct!, this is a group of files",
32        "DEFAULT":"This is a list of different files."
33      }
34    },
35    "readme":{
36      "content":"<img src=\"/static/draganddrop-data-management/readme.png\" alt=\"folder\">",
37      "reuse":true,
38      "feedback":{
39        "folder":"Correct!, This is a readme file",
40        "DEFAULT":"This is a readme file that contains meta data.."
41      }
42    }
43  },
44  "droppables":{
45    "source":{
46      "correct":[
47        "source"
48      ]
49    },
50    "date_folders":{
51      "correct":[
52        "date_folder"
53      ]
54    },
55    "experiments":{
56      "correct":[
57        "experiment"
58      ]
59    },
60    "files":{
61      "correct":[
62        "file"
63      ]
64    },
65    "readme":{
66      "correct":[
67        "readme"
68      ]
69    }
70  }
71}
Once your Acos exercise is ready, and the exercise files have been created, you will have two choices for running your code locally in the browser. The first option is to run the exercise with a copy of the Acos-server in your computer. The second option is to run the exercise by using a pre-installed docker container which is downloaded after you have compiled an A+ course for the first time.
Important
Before proceeding to test your Acos exercise, you should configure the localhost
in your computer. Therefore, you should verify that your host file have the 127.0.0.1 acos configuration.
Test Acos activities locally
In order to test Acos exercises locally, you should download the acos-server repository from GitHub. Once you have downloaded this repository, you should link the Acos exercise you have developed to the local Acos-server.
Open the terminal in the exercise project directory that you created above, and type:
sudo npm link
Open a terminal in the Acos server project directory and type:
sudo npm link acos-draganddrop-data-management
(The
acos-draganddrop-data-managementname will vary according to the name of your package.)Now, it is time to run Acos server locally. For that, you need to open the terminal again in the Acos server project directory and type:
npm startYou can now open a web explorer and visit http://acos:3000. Your exercise should be running under the draganddrop-data-management package.

Important
Once you have created the npm link to the Acos package folder (npm package), all the changes in your exercises will be reflected in the
node_modulesfolder of the Acos-server.Normally, you will have to stop/start the node module every time you make changes in your exercise. (Ctrl + c to stop the module and
npm startto start).
Test Acos activities with Docker
After you have compiled your A+ course in your computer for the first time, the Acos docker image is downloaded and installed locally. It means that you can make use of that docker image to test your Acos exercises in a docker container.
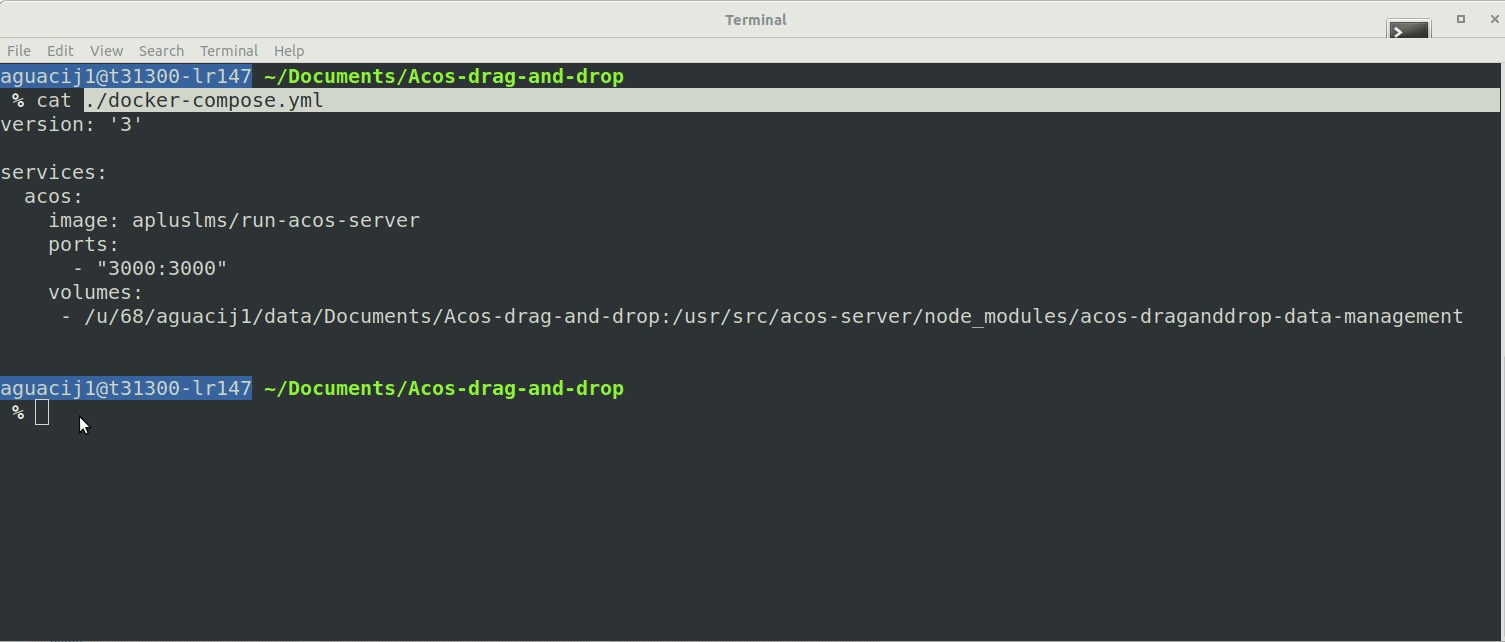
Once you have created your activity. You should create a docker-compose.yml file, in the root of
your project exercise, with the following information in it. You can also find that file in the zip file provided in this chapter.
1version: '3'
2
3services:
4acos:
5    image: apluslms/run-acos-server
6    ports:
7    - "3000:3000"
8    volumes:
9    - .:/usr/src/acos-server/node_modules/acos-draganddrop-data-management
After adding the docker-compose file, the structure of your folder should looks like follows.
.
├── docker-compose.yml
├── exercises
│   ├── data_structure.json
│   └── data_structure.xml
├── index.coffee
├── index.js
├── LICENSE
├── node_modules
├── package-lock.json
├── README.md
└── static
    ├── data_folder.png
    ├── date_folder.png
    ├── exp_folder.png
    ├── file.png
    ├── link_folder2.png
    ├── link_folder.png
    ├── project_folder.png
    ├── readme.png
    ├── scripts.png
    └── src_folder.png
Now, it is time to run the Acos server using the docker container, and visualise your exercise in your web browser. Therefore, you should open the terminal in the Acos package you are developing and run the following command.
docker-compose up
Once you have run the docker-compose up command, you will be able to see the Acos exercises in the browser.
Warning
Every time you make some changes to your exercises, you should stop and start the docker container in order to visualise the
changes you have made. You can stop the docker container by typing Ctrl + c in the terminal that is running the
container, and you can start the container by typing docker-compose up in the same terminal. If for some reason you do not
stop and start the container, your changes will not be reflected on the web browser.
Additional Resources
You can find more information on how to develop Acos exercises in the following links: